In an earlier post, I’ve done a pretty detailed walkthrough of setting up Cleanflight on your flight controller.
Back then, even if your board was running Betaflight, you would still set it up through the Cleanflight configurator. Now, however, Betaflight has its own configurator, which is not all too different from the original one, but has some neat added features.
Assuming you have already installed the configurator from the Chrome store the configurator from GitHub(read more about this here) and have the correct drivers, the first step is to flash Betaflight onto your board.
Flashing Betaflight
In order to flash Betaflight, you may first need to short the “BOOT” pins on your board and then connect the USB into your computer. If you shorted the pins correctly, the LEDs that normally flash on your board when you plug it in will not turn on, and instead there will be just one LEDs. This will be different from board to board, so you’ll have to consult your manual.
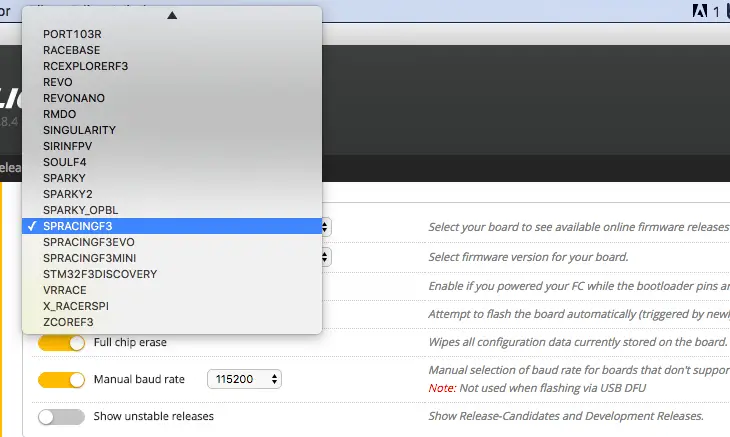
If you’ve entered the BOOT mode correctly, the next step is to select the correct board and firmware, click the Load Firmware(Online) button, and then click the flash button. It’ll take a few seconds, and if all goes well, you should have Betaflight(whichever version) loaded onto your board.
Remove the short circuit from the BOOT pins, and you are ready to set things up.
Note: Once you’ve connected by clicking the “Connect” button, you’ll see a toggle for “Expert mode”. You won’t really need to enable this for basic setup, but if you want, you can enable it and check the now-appeared Failsafe and OSD tabs.
Tab 1: Setup
In this tab, just calibrate your accelerometer once, and then pick up your quadcopter and make sure it moves the same way on the screen as it does in your hand. That’s about it 🙂

Tab 2: Ports
In this tab, don’t mess with anything unless you are using SBUS or DSM2/DSMx for your receiver. If you are, you’ll have to check which UART your board uses for Serial RX, and select Serial RX under the corresponding UART like I’ve done with my setup. This screenshot is from an X-Racer, which uses UART3 for Serial RX.
UART1 MSP will be enabled by default, so don’t touch that.
If you are using an external SD card for BlackBox recording, you’ll have to enable the toggle under the corresponding UART under Logging. The ports will be different from board to board, so you’ll have to consult the manual.
Note: The X-Racer and SP3 both have 16 and 8 mb of flash storage built in, which is about half-2/3s of a flight on 4kHz and nearly an entire flight or more on 2kHz, which should be enough for basic tuning.

Before you go from one tab to the next, make sure to hit the Save button at the bottom, or else you’ll lose all your settings!
Tab 3: Configuration
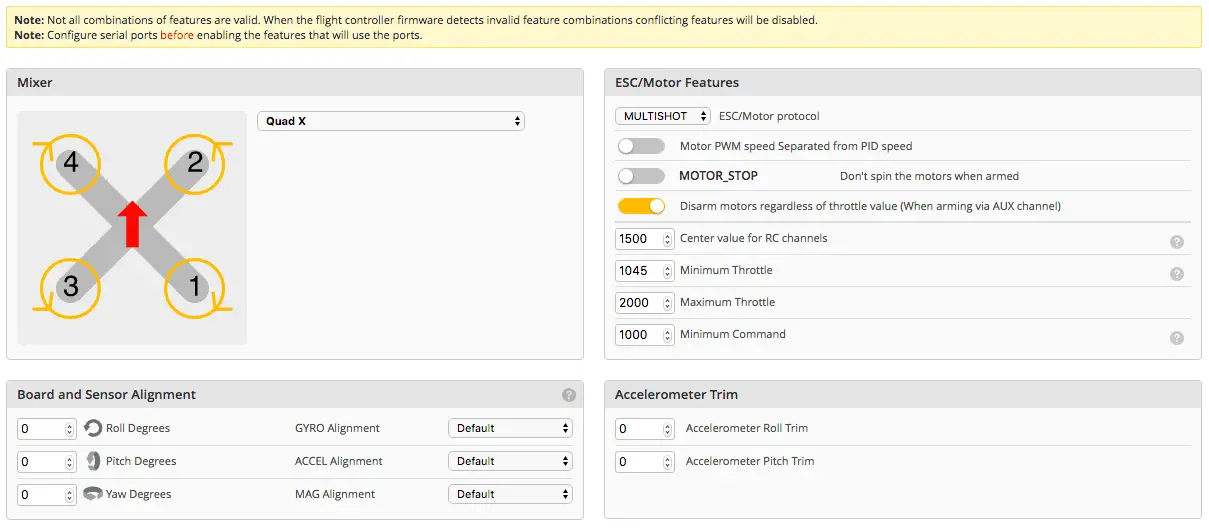
In the top right, you’ll have to choose your ESC/Motor protocol. This will be OneShot, MultiShot, or DShot – just make sure that your ESC is compatible with whatever protocol you choose. BLHeli ESCs will definitely work with OneShot, BLHeli_S ESCs will definitely work with MultiShot and OneShot, and DShot requires special setup.
I keep MOTOR_STOP off because Airmode is on, and airmode means the motors will spin up as soon as you arm. Keep the Disarm motors regardless of throttle value toggle on, as it is useful for emergency disarming in midair. This of course only applies if you plan on arming/disarming via a switch instead of the sticks.
Using a switch is a good idea.
As for setting Minimum throttle, leave that be for now, as you’ll have to determine that value from the “Motors” tab which will come up later.
Under “Board and Sensor Alignment”, adjust anything only if you have mounted your flight controller with the arrow drawn on it pointing in any direction but forward.
Note: as long as your board is flat, you’ll only need to adjust yaw.
Adjustments work in degrees, so 90, 180, or 270 would be usual values. If your frame has you mounting the FC in a diamond shape, then go for 45, 135, 225, or 315.
Scrolling down further in the Configuration tab, you’ll see receiver mode.
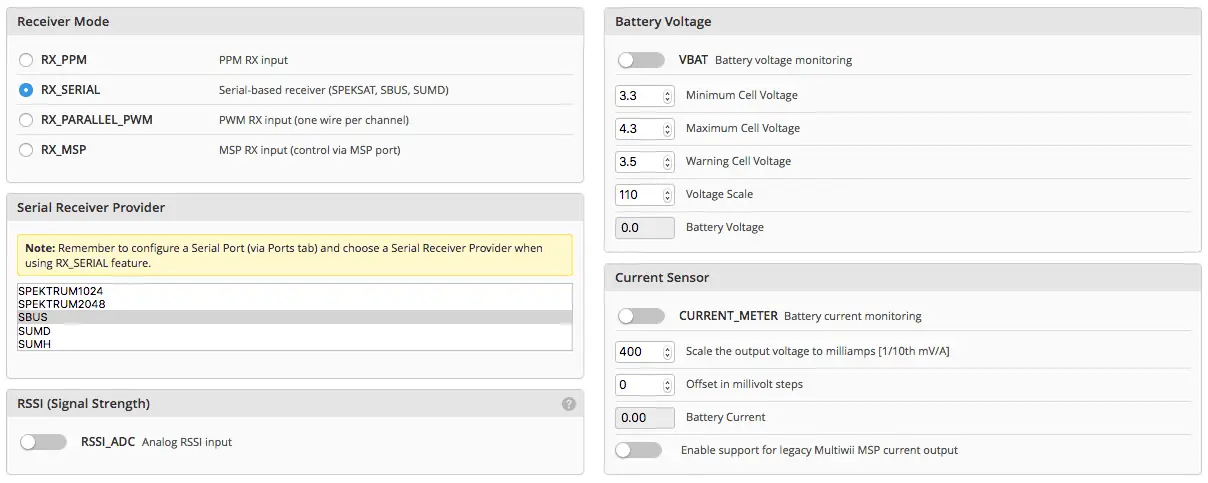
RX_PPM is CPPM, RX_Serial is for SBUS or Spektrum/DSM, and RX_Parallel_PWM is for when every channel has its own wire(older FlySky and Turnigy receivers).
If you’re using RX_Serial, you’ll have to choose the protocol from the Serial Receiver Provider tab, whether it’s SBUS or Spektrum.
Under Battery Voltage, if you’ve got the voltage from your battery hooked up to the VBAT port on your flight controller(check the manual), you can activate VBAT and BetaFlight will monitor the voltage and if you set up telemetry, send it to a compatible radio.
Further down, there’s a section on System configuration.
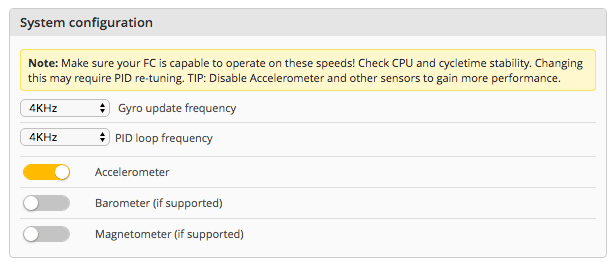
The Gyro update frequency depends on what kind of board you are running. If you’ve got an F1 board like a Naze32 or similar, keep it at 1 KHz. If you’ve got an F3 board, you can run 4KHz or 4KHz(not all F3 boards can run 4KHz, consult the manual!)
A greater KHz means a faster “looptime”, which is how fast the data from the flight controller sensors is refreshed and a signal is sent to the ESCs to maintain stable flight.
Theoretically, a higher looptime will mean smoother flight.
As for the PID loop frequency, make sure your ESCs are capable of receiving a high enough looptime. On this build, which uses RacerStar 30A BLHeli_S ESCSs, I checked to make sure it can run 4KHz. If you are not sure, leave it at the default.
Keep accelerometer on, and if you are building a miniquad, you probably won’t have a Barometer or Magnetometer, so leave those off.
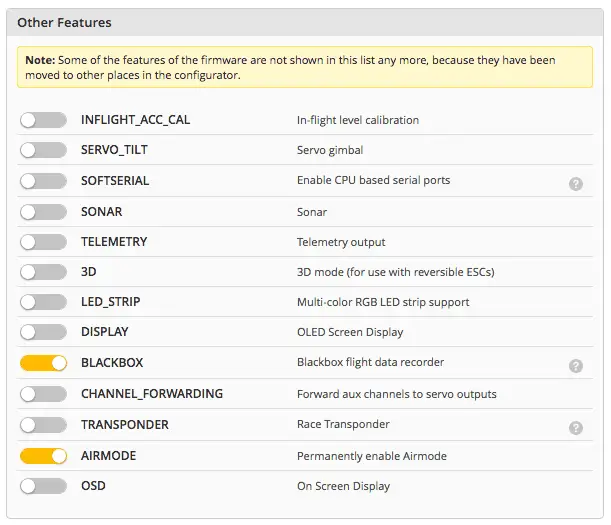
Finally, in the very bottom of the Configuration tab, you’ll have “Other features”. At the very least, you want to enable Airmode(which will keep it on permanently). This is a good idea, because I used to have Airmode on a switch, and I forgot to enable the switch before taking off. Long story short, my quadcopter broke an arm.
You can turn on SoftSerial or Telemetry if you are using it, and Blackbox, too, if your board has memory built in.
Tab 4: PID Tuning
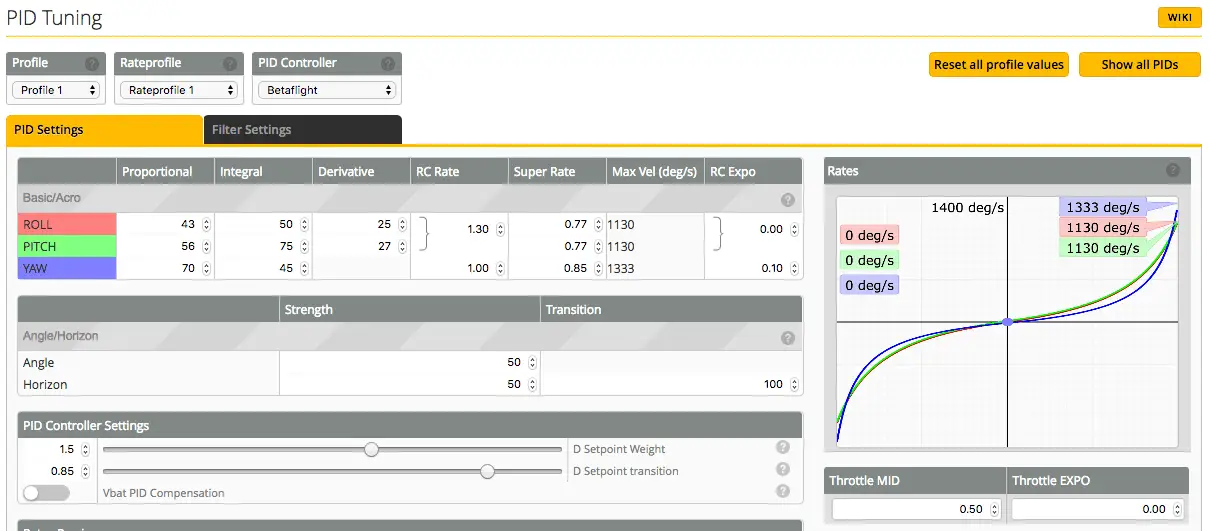
In the PID Tuning tab, if it’s not already so, set the PID Controller to Betaflight. This is an awesome PID controller and you are almost tuned to fly at defaults.
Leave the Roll, Pitch, and Yaw PIDs at defaults for your maiden. You can always adjust them later. The RC Rate, Super Rate, and RC Expo will determine how fast your copter moves on those axes at full stick deflection.
Check out this guide for how to tune BetaFlight 3.0 onwards
And this guide for general PID tuning
The graph on the right will show you how the copter will respond to stick movements. At the very least, change the “Super Rate” value to something you can manage. I keep Roll and Pitch at 0.77 with my RC rate at 1.30 and RC Expo at 0.00. These rates give me very smooth movements near the center of the sticks, and the further out I go, the faster the movement is. You can see the speed in degrees/second. My rates are 1130 deg/s for pitch and roll, so if I held the sticks at full deflection, I’d do 1130/360 = 3.13 rolls/flips per second.
0.77 is a fairly high RC rate if you are just starting out. I’d recommend keeping it much lower(0.3 to 0.4) and gradually increasing as you get more comfortable on the sticks.
Tab 5: Receiver
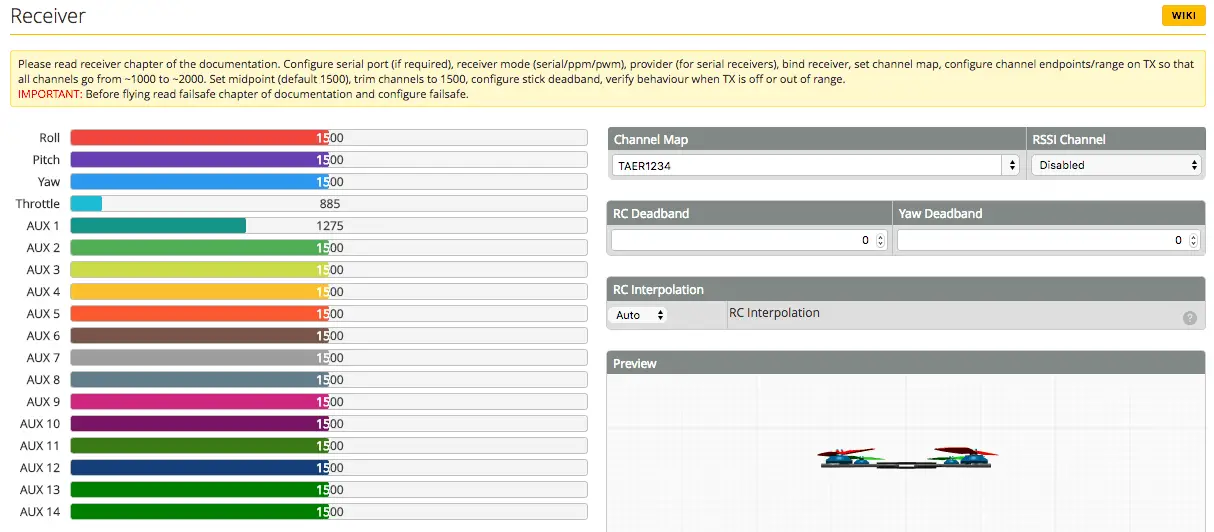
To make use of this tab, you’ll have to make sure your receiver is getting power and is bound to your radio, and that your radio is on. In some cases, plugging the USB into the flight controller will power the receiver too, but on other boards, you’ll need to plug in the lipo to get the receiver on.
Note: If you’re connecting a lipo, REMOVE the props!
Note 2: This assumes you’ve already bound the receiver to your radio.
If everything is set, you’ll be able to move the sticks on your radio and see the corresponding axes move on the screen. If the wrong axes are moving, your channel mapping is off.
In this setup, my Channel Map is TAER1234, or Throttle Aileron Elevator Rudder. If the wrong axes are moving, you’ll have to move each stick independently to determine the correct order and set that under Channel Map(eg AETR1234, or some other combination).
You also want to flick the switches on your radio and make note of which switch moves which AUX channel – you’ll need that to set up arming/disarming. If you’re using a Taranis, you can program which AUX channel is connected to which switch. With Turnigy/Spektrum, you’ll have to flick the switches and see.
Tab 6: Modes

In the modes tab, you can assign switches to activate flight modes and arm the copter.
I don’t have Angle mode or Horizon mode set up at all, so I only use switches for Arming. In the receiver tab, I noted that the switch I wish to use for arming is on AUX 1, so first, click the “Add Range” button to get the yellow bar and sliders to show up.
Assuming your radio is still connected, flick the switch through all its positions to make note of where the little yellow dot goes in each position.
A good idea is to have the default switch position(usually all the way up) for Disarm, and the bottom switch position(s) for arming.
Move the sliders in such a way that when the switch is all the way up, there is no yellow dot under the yellow bar, and when the switch is down, the dot is below the bar. When the dot is below the bar, the mode is active. When it’s no longer below the bar, it’s no longer active.
So Arm active is “Armed” and Arm inactive is “Disarmed”.
If you scroll further down, there are other modes, most of which you won’t need for a miniquad, except Blackbox, which if you are using, you can assign to any switch. I usually keep it on the same position as Arm, so as soon as I arm, Blackbox starts recording.
Tab 7: Motors
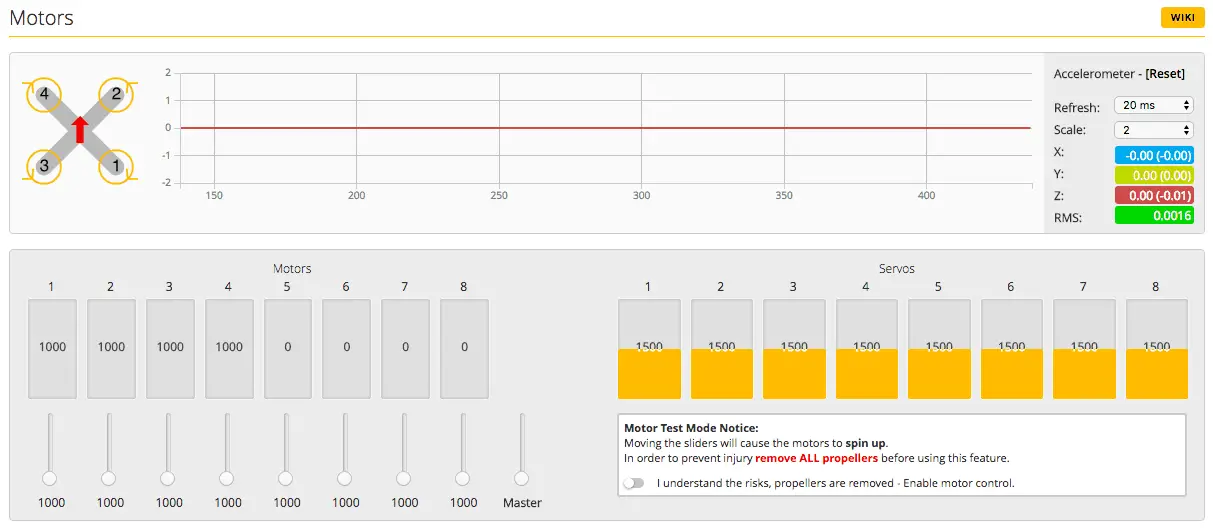
We’re almost done! Since you are setting up a new build, you’ll first want to test the motors to make sure they are spinning correctly, then calibrate your ESCs to get Min Throttle right.
Turn on the toggle that says “I understand the risks…”, and HAVING PROPS OFF, move up the sliders of each motor from 1 to 4(miniquad) one at a time and make sure the correct motor is spinning, and in the correct direction.
If the direction is incorrect(CW instead of CCW), you can change the direction through BLHeliSuite or by switching any two of the three wires connecting the motor to the ESC.
If the wrong motor is spinning, check out this excellent tutorial by Joshua Bardwell to rectify the issue:
Calibrating ESCs
With your battery disconnected, turn on the “I understand risks” toggle, and move the “Master” slider all the way up.
Next, plug in the battery(MAKE SURE PROPS ARE OFF!)
The ESCs will make some musical notes, and once they finish beeping, move the Master slider all the way down. The ESCs will make some more musical notes.
Unplug your battery, and turn off the I understand risks toggle.
Your ESCs are now calibrated.
Now, we have to determine what the Min_throttle value we skipped in the Configuration screen will be.
Plug your battery back in, turn the toggle on again, and start to very slowly move up the Master slider until the motors are just barely spinning but still smoothly, without any jerks or twitches.
Make a note of the value displayed under the toggle.
The value you will enter on the Configuration tab under “Min_throttle” will be the value you noted + 15 or so. So if your motors spun smoothly at 1045, you’d put around 1060 in Min_throttle.
Note: This is the way I do it, I’ve seen some people use an even lesser value, but I feel 15-20 more is fine. If you are using DSHOT, you do not need to calibrate your ESCs.
How to setup failsafe in Betaflight
How to setup failsafe on Betaflight is a little different from before – I learned this the hard way, when I thought I had set it up correctly but ended up with a flyaway!
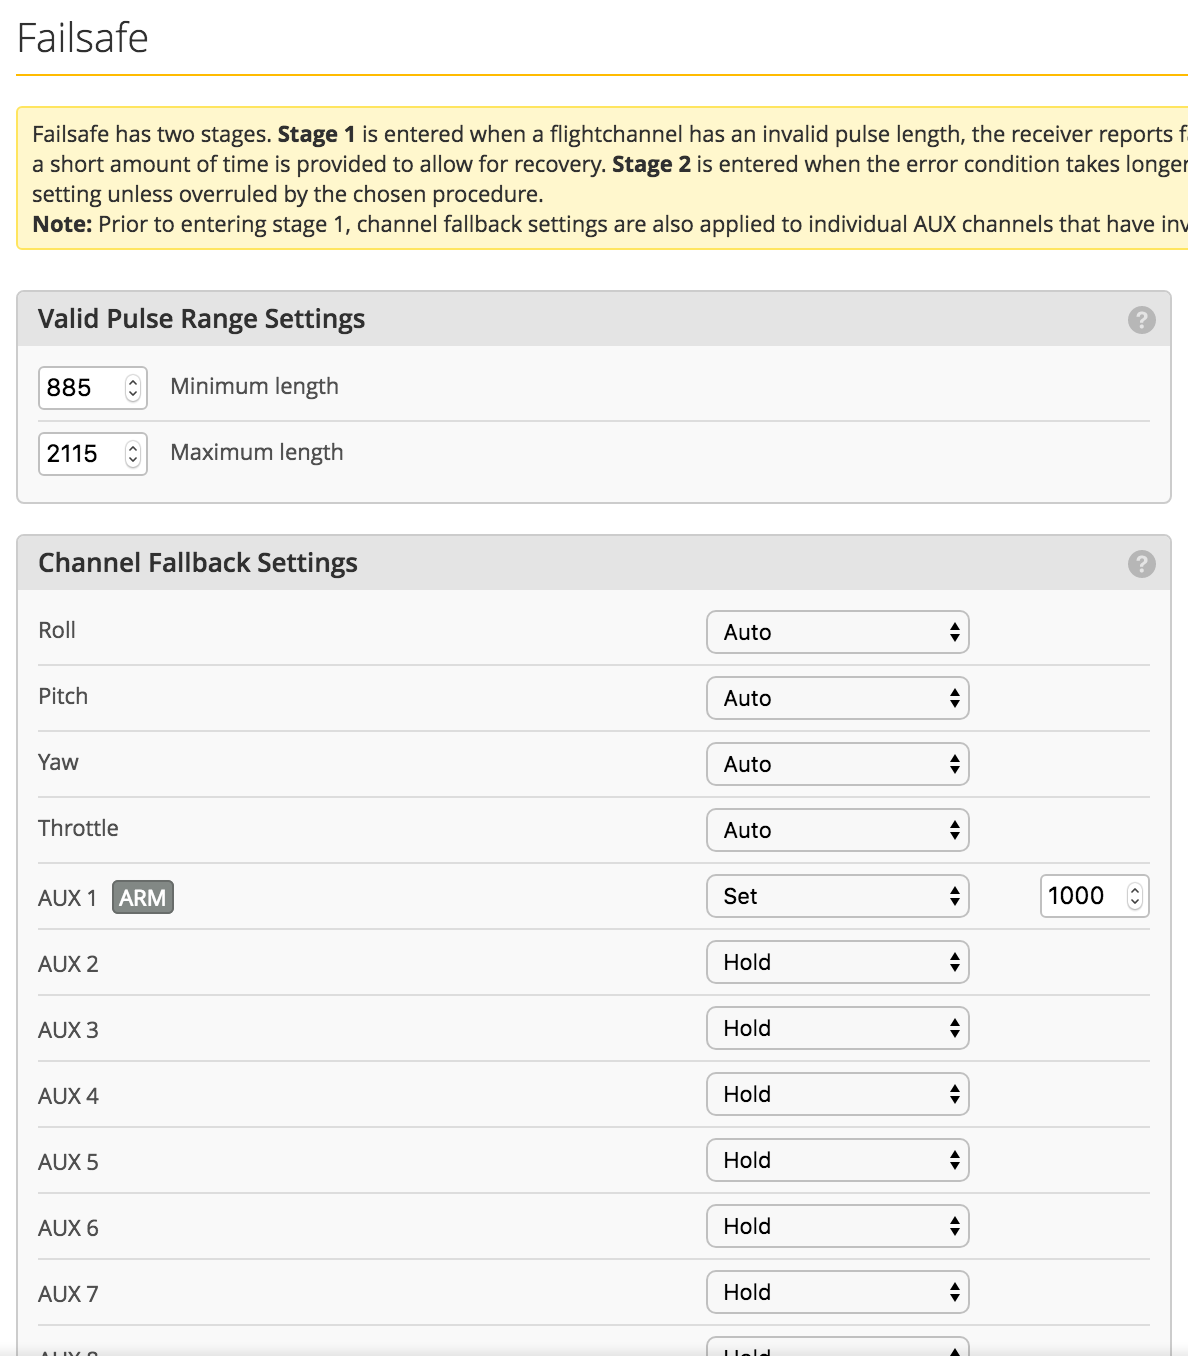
In the failsafe tab(make sure Expert Mode is on), you’ll be able to see if the copter is set to drop or land. Make sure that the “Drop” option is selected. However, if you arm using a switch and have airmode activated, you need to do one more step!
Find the AUX channel that you used to arm with, and instead of “HOLD”, change it to SET and to a value where the mode is no longer activated(find the values from the MODES tab).
Generally, you’ll have the arming mechanism work when the switch is in the down position, so arming works when the value is far greater than 1000. In that case, set the value in the Failsafe tab to 1000. If you don’t do this, your copter won’t disarm!
You’re done!
At this point, the basic setup is done and you are ready to go fly!
Just to be thorough, enable “Expert Mode” from the top right, and head over to the newly appeared “Failsafe” tab and make sure the Failsafe is set to “drop” and not “land”.
“Drop” means your copter will cut throttle to all motors if it loses connection to your radio.
If you’ve enabled Blackbox, head over to the Blackbox tab and make sure you’ve selected the correct place to save the data, whether it’s the on board dataflash if your board has it, or an external memory card.
You’ll also need to select how much data is saved(percentage of speed). For proper blackbox tuning, it needs to be set at 100%.
That’s about it!
Go out and fly!
Troubleshooting
Fixing the motor order if you soldered them incorrectly
I am new to this and have a problem. When i try to flash via my Mac I just get a message: “No response from bootloader.” i have used several different cables and have tried the boot jumper all to the same result. I have noticed that my “Connect’ button in the upper right always stays green and says “connect.” Also, my USB port does not show up on the list of ports next to the connect button. Am I not connecting at all? Is there a driver I need? They all appear to be Windows only. Can you help with this? Thanks. (if possible, please reply by email.)
Yeah get rid of the mac and get a real womdows pc
I am new to betaflight and this tutorial has ben more use than most on the net
Many thanks
Thank you, that’s incredibly kind of you to say 🙂
Happy flying!
Your guide is awesome.
I used it to setup a DIY quad with a Naze32 using Optima D Hitec RX in SBUS mode.
I noted if I put too high frequency, mine above 2khz by instance, in Gyro Update and PID Loop, quad can’t stabilize to be able to arm the motors. Lowering it to 1khz it stabilizes perfectly and I was able to arm and spin the motors.
Another point of attention is related to Airmode. When it’s enabled and you give some throttle without propellers, then lower the throttle to the minimum, RPM will constantly go up indefinitely. I know if it’s in the air it should not happen, but took me a while to figure it out.
Awesome guide, congrats.
Thank you very much for the kind words!
Yeah, a lower gyro update/PID loop means less noise reaches the gyro, so if you have a noisy build, lower looptimes can indeed help it fly better.
RPM constantly goes up because the I term is expecting changes which it’s not seeing on the ground without props, so it spins the motors up.