Update: This is an older guide that uses the Cleanflight configurator and older versions of Betaflight. Check out the updated guide here.
Building a quadcopter is a two part job – assembling the hardware and then configuring the software. I remember when I first started researching quadcopters and APM/older MultiWii boards, the whole setup process was quite daunting.
Things have gotten much easier, though, thanks to software such as Cleanflight and Betaflight.
Cleanflight and Betaflight are the software of choice to use on acro/racing multicopters, and work seamlessly with the Naze32 flight controller board, as well as other higher-end boards like the RMRC Dodo and Seriously Pro boards.
Regardless of what board you have(as long as it’s Cleanflight compatible, which you can see on the product page itself or manual), setting up the software will be more or less the same.
Note: This guide walks you through setting up telemetry using Softserial. For softserial telemetry to work, the green wire from your D4R-II receiver should go into receiver port 6 on your Naze32 board. For monitoring cell voltage, connect your main PDB to the two VBAT ports on your Naze32. This is all you need to connect.
If you don’t want to set up telemetry, ignore the telemetry steps and go ahead.
Downloading drivers and software
To get your computer to recognize the Naze32(or other boards), you’ll first need to download and install some drivers.
Also, to configure Cleanflight/Betaflight on your computer, you’ll need the Google Chrome browser, since the configurator software is a Google Chrome app.
If you don’t already have Google Chrome, you can get it from here.
Once you’ve got Google Chrome, you can download the Cleanflight Configurator software. Cleanflight and Betaflight can both be configured from the same software. You’ll have to open the link from Chrome itself.
After you install it, you’ll be able to find it in the Chrome App Launcher.
Flashing the software to your Naze32
Plug your Naze32 into your computer’s USB, and wait for your operating system to recognize and install the board. You already should have installed the SiLabs drivers I linked to above.
After your board has been recognized(you’ll get confirmation from Windows, but on OS X, just wait a couple of minutes and it should have been done. If you use Linux, you probably know a LOT more about computers than I do).
Launch Cleanflight Configurator, and you may see that it connects automatically. If it did, you’ll see a screen like this:
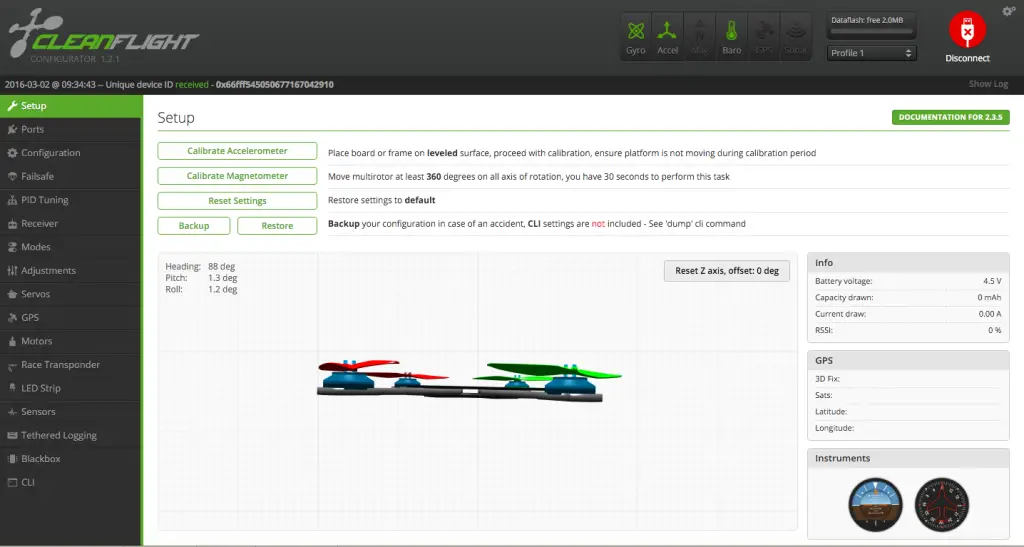
If not, click on the big green “Connect” button in the top right(in the image, the same button is red and says “disconnect”).
If it doesn’t connect, make sure you have the correct port chosen from the drop-down menu next to the Connect button.

It may not be the same for your computer, so you may have to try all of the options.
Once you are connected, disconnect! This was just to make sure that the board was working fine 🙂
After disconnecting, click the “Firmware Flasher” tab on the left side, and you’ll be taken to a screen like this:
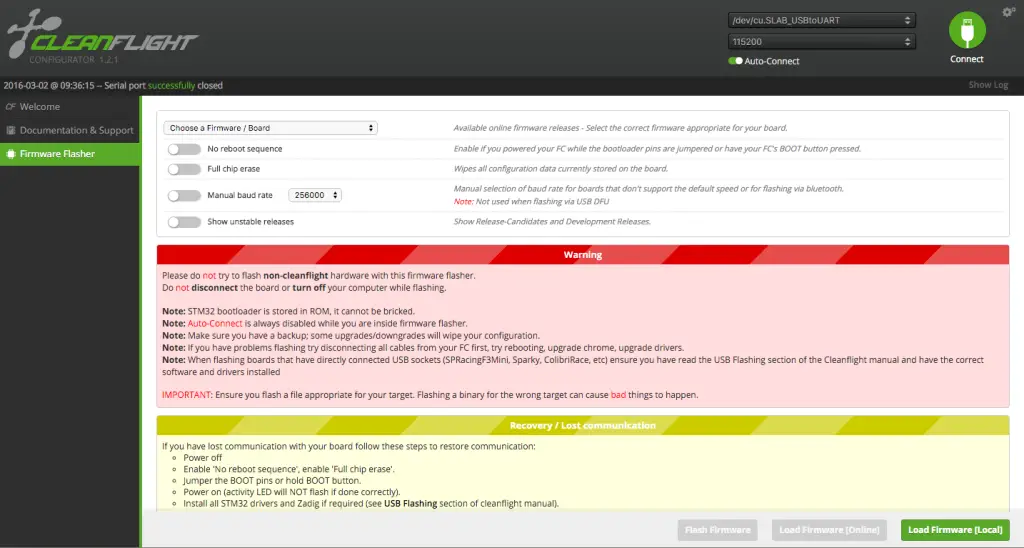
If you are flashing Cleanflight, then use the dropdown menu that says “Choose a firmware/board” to select the latest version for your board. There will be many choices – just make sure you choose the latest version that has your board name(like “Naze”) next to it.
Leave all of the options below unchecked, except “Full chip erase”. Select that, since you are flashing a brand new board and you want to start with default settings.
Once you select the board and version from the menu, you’ll see the “Load Firmware(Online)” button becomes clickable. Go ahead and click on it.
The software will load the firmware, and once loaded, the “Flash Firmware” button will become clickable.
Click on it, wait for the progress bar to complete, and you have the latest Cleanflight on your board! Woohoo!
If you are flashing Betaflight
If you’d like to flash Betaflight, the process will be a little different. Instead of getting the firmware through Cleanflight Configurator, you’ll have to download the firmware yourself and then use the “Load Firmware(Local)” button to find that file.
Betaflight releases can be found on their GitHub page here. Choose the latest “Release” version – or if you are adventurous, the “Pre-release” version, and scroll down to find the file for your board. In this case, for “Naze”. Download the file and save it somewhere you will remember.
Then come back to Cleanflight configurator, and click the “Load Firmware(Local)” button and find the file you downloaded.
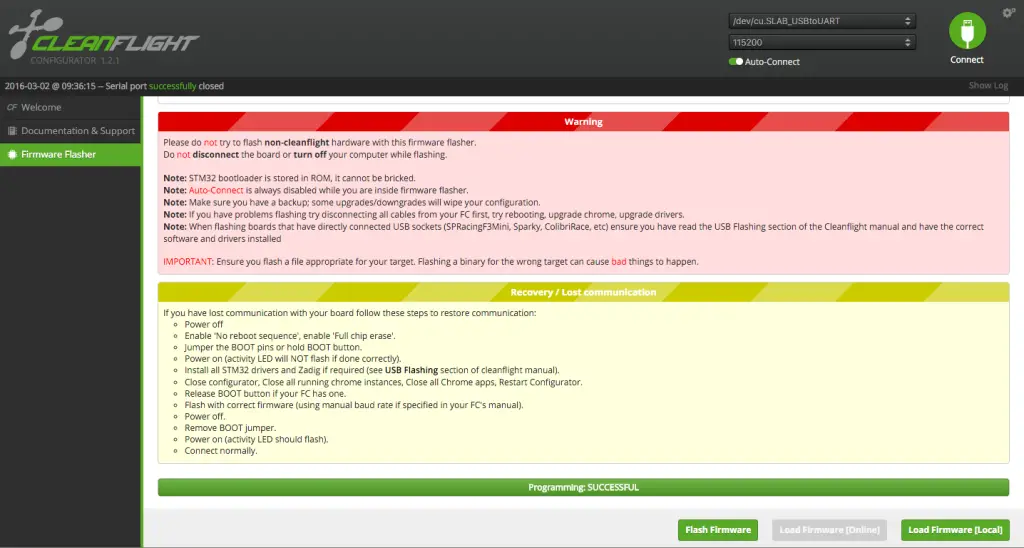
Click the “Flash Firmware” button, and let it do its thing. Once the progress bar reaches full, you’re all set!
Remember to keep “Full chip erase” if you want to set it up as a brand new board.
Configuring the software
Now that you’ve flashed the software, click the green “Connect” button and then head over to the “Configuration” tab. There’s going to be a lot of stuff to do here!
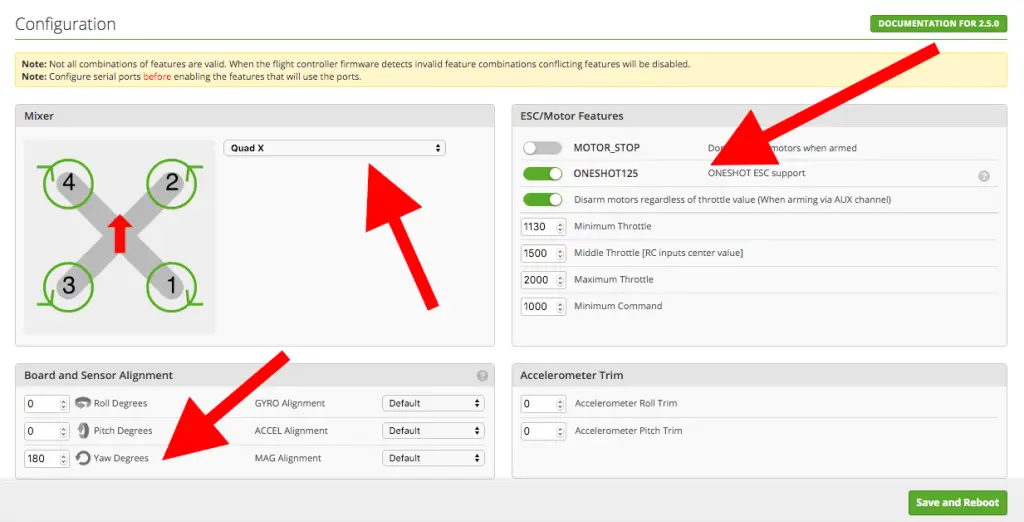
First, make sure that the Mixer is correct. The default will be “Quad X”, and most racequads(even if it’s a H-style) will be Quad X. If you are building something other than a Quad X, then either this guide is far too basic for you anyway, or you should stick to a Quad X.
Below the Mixer, you have the board and sensor alignment. On your board, you’ll see a small arrow – that’s the default direction the board should be facing on your quadcopter – and the board should be flat. However, if you don’t mount it that way, then you can use the alignment to correct for it.
So on my ZMR 180, I’ve mounted the board so that the arrow is pointing to the back of the quad. As a result, I’ve adjusted the Yaw to 180 degrees. If you’ve mounted your board on a tilt for whatever reason, you would adjust the Roll or Pitch – although that’s for more advanced builds.
Under ESC/Motor features, there are a few options.
MOTOR_STOP will not spin up your motors when you arm the quadcopter. You can choose to keep this on or off – but be warned – as soon as you arm the board, the motors(and propellers) will start spinning. Even at that speed, they can cut you pretty badly.
The next option is “Oneshot125” – leave this on.
Leave the “Disarm motors regardless of throttle value” switch on, too, as a safety measure.
Hit save and reboot.
To find out “Minimum throttle”, you’ll have to head over to the “Motors” tab. Plug your battery in(make sure props are off and FPV antenna is connected), and turn the warning switch in the bottom right on.
Then move up the master slider very slowly until the motors just begin to spin properly. Any below that and the motors stop spinning properly. Make a note of the value displayed.
You want to set your minimum throttle to about 20-30 more than the value displayed earlier.
Leave the other numbers as they are.
Next, come back to the “Configuration” screen:
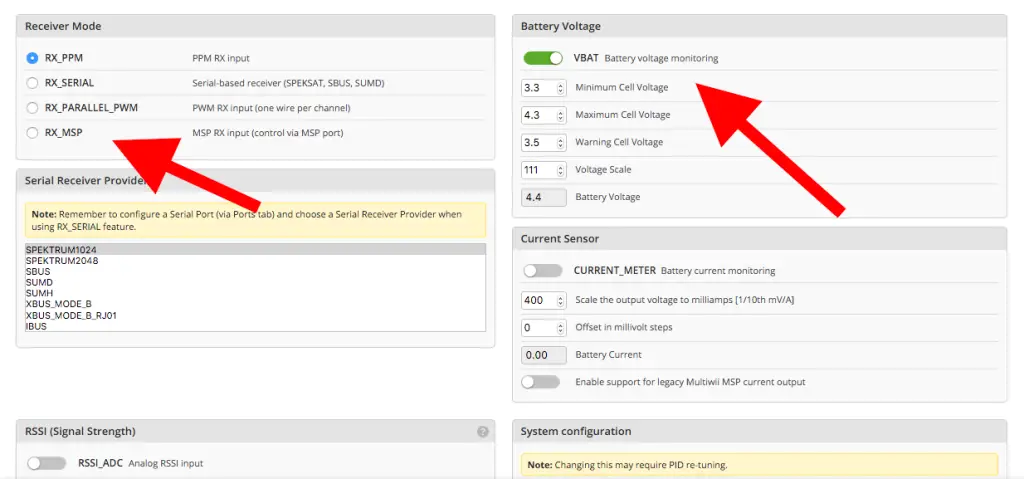
On the same screen, scroll down. Under “Receiver mode” you’ll have to choose what kind of receiver you are using.
PPM receivers send all the signals through just one wire – the FrSky D4R-II is a great PPM(they call it CPPM) receiver and especially if you are building a miniquad, the small receiver + one wire connection saves lots of space and calls for a clean build. If you have a Taranis and a D4R-II(or other PPM receiver), or even a FrSky module and this receiver, choose this option.
SBUS is a step above PPM – FrSky makes SBUS receivers, so if you are using one of those and have connected your receiver to the SBUS port on your Naze32/flight controller, choose that.
If you use a Spektrum/DSM2/DSMX receiver(LemonRX, OrangeRX), then you’ll need to choose RX_Serial. Additionally, you’ll have to go to the “Ports” tab on the left and set the UART2 setting to “Serial RX”.
If you use a regular Turnigy 9x(where you’ll be plugging one servo wire for each channel, or even an entire breakout cable), you’ll need to choose RX_Parallel_PWM.
Next, under “Battery Voltage”, if you are going to be using telemetry on your FrSky Taranis and want to receive battery voltage data on your transmitter, turn the “Battery voltage monitoring” switch on.
I don’t touch the warnings, since I set those up in my radio.
Voltage scale is something you’ll have to play with. I think it defaults at 110, but if you find that your battery is giving a different reading through telemetry and a different reading on your charger/checker, you’ll have to play around with the value(increase/decrease by 1 or 2) to get it to match.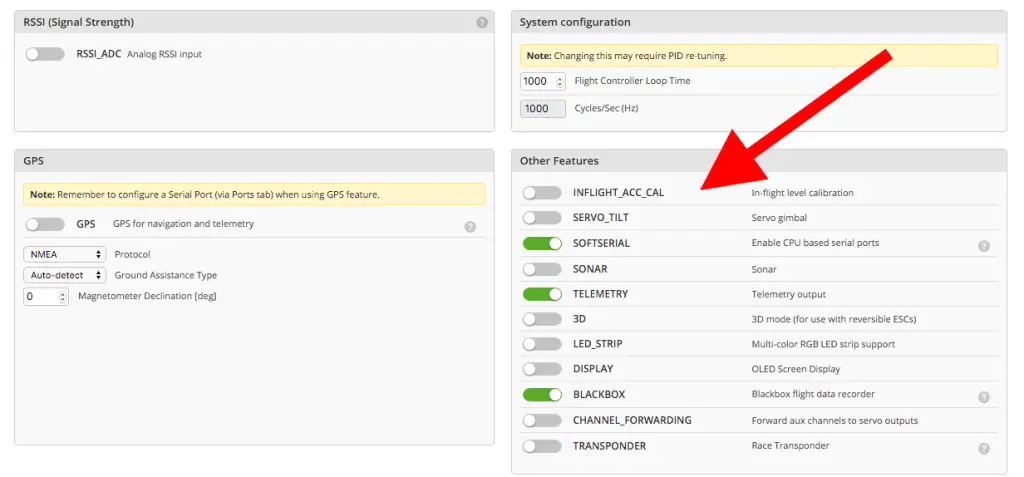
Scroll down further to the end of the “configuration” page. Under other features, you’ll want to enable “Softserial” and “Telemetry” if you want telemetry, otherwise, you can leave it off.
If you have flash memory on your board(the Naze32 full boards do), you can turn on Blackbox to record flight data(you can then export the flight data into image files – this is how some videos have stick overlays!).
Click save and reboot, and wait for the board to reboot.
PID controllers
Next, go to the PID Tuning tab.
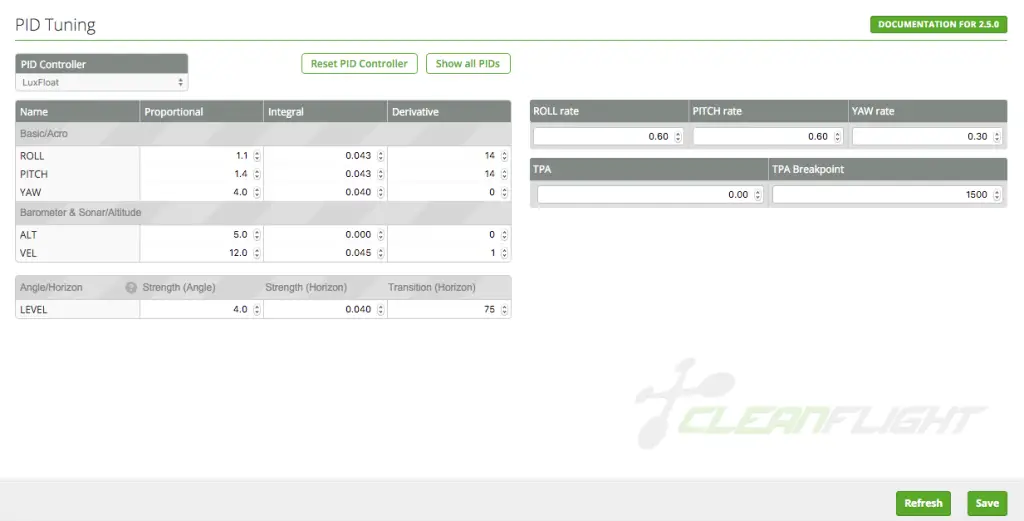
Hypothetically, you could leave this tab alone and still be able to fly, but your quadcopter may not be as stable as you like. I am running Betaflight, and the “LuxFloat” PID controller works wonders without having to change the settings too drastically.
I choose Luxfloat and keep default values, then take the quadcopter out for a few flights, see how it performs, and then tweak the values as I feel necessary.
I am no expert on PID tuning, but this video by Alex Greve is by far the best explanation I’ve seen. I highly recommend you watch it.
The values I do adjust are the Roll rate, Pitch rate, and Yaw rate.
Basically, the higher these values are, the faster your stick inputs are going to be. At 0.0, your quadcopter will do lazy rolls and flips – and lose lots of altitude in the process.
To get those really fast flips and rolls, you’ll have to increase your rates.
I keep mine at 0.6 for Roll and Pitch, and 0.3 for Yaw. These are my personal preferences – some people will keep them lower, and some higher.
Don’t increase your rates unless you are a confident flier and have developed good stick control. If you don’t feel like you are in complete control of your multirotor, leave the rates low to practice and get a feel for the controls, then gradually increase them and get used to them.
With really high rates, you only need to move the sticks very slightly to get a strong response from the quadcopter. If you mash the sticks without knowing what you are doing, you will crash, and you will crash hard.
Receiver configuration
Next stop is the “Receiver” tab.
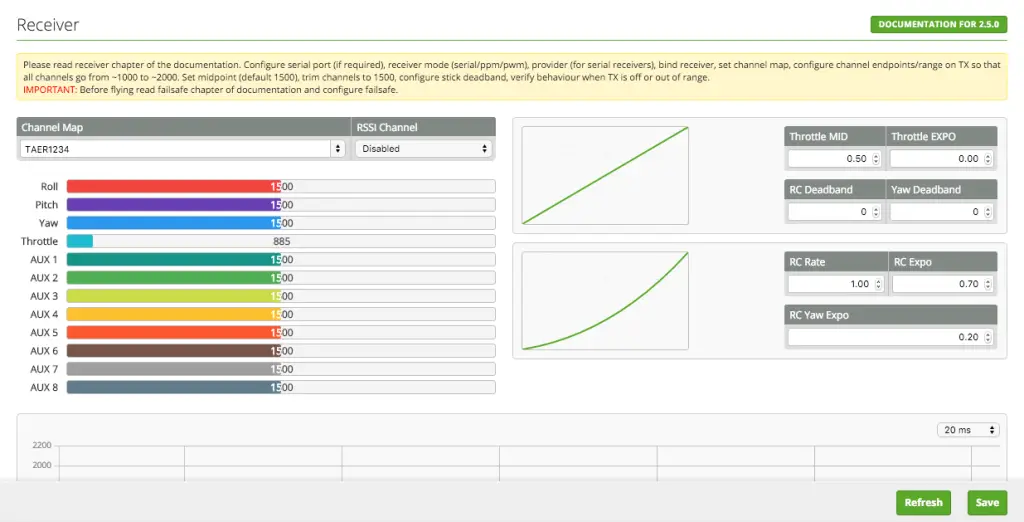
The first thing you want to do is change your channel mapping. To do this, turn on your radio and plug the battery into your quadcopter.
Make sure the props are off when you do this, and that your FPV antenna is connected!
Once the radio connects to the receiver(assuming the receiver is connected to the board), the values will change and start moving very slightly.
At this point, you want to move your sticks on their axes one by one and make sure the correct axis moves on the screen. Move throttle up and down on your radio, and see whether the information you see on the screen corresponds!
Do the same for all your other channels.
If what you move is not the same as what you see on the screen, you’ll need to change the channel mapping.
The default channel mapping in Taranis radios(assuming you didn’t change any settings when you created the model in the radio) is TAER – Throttle Aileron Elevator Rudder – so I’ve changed the value in “Channel map” to TAER1234.
Once the values are ok for sticks, you can flick the switches(if any) and see which AUX channels move. This won’t be a problem with the Taranis since you can assign any switch to any channel.
If you are using a Turnigy 9X with a breakout cable, you’ll have to experiment.
Flight modes
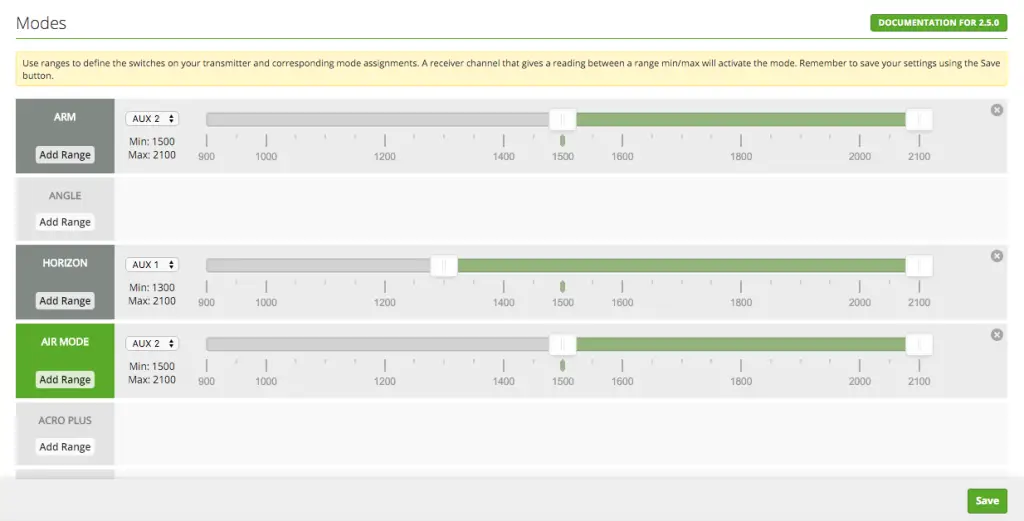
In the “Flight modes” screen, you have the option to set switches on your radio to activate different flight modes. If you have no flight modes activated, then the default is “Rate” mode.
In “Rate” mode, the quadcopter will fly with full manual input. That means it will not level itself out after you let go of the roll/pitch sticks. So if you tip the quadcopter forward and center the stick, the quadcopter will maintain that angle and keep flying that way until you correct it.
Rate mode is also known as “Acro” mode – and this is the best way to fly FPV as it’ll give you full control over the quadcopter – you won’t be fighting the quadcopter as it tries to level itself.
If you are a complete newbie, you may find Rate mode difficult.
In that case, you’ll want to use “Horizon” mode. In Horizon mode, the quadcopter will level itself once you let go of the sticks. This is especially useful when you are flying line of sight and lose orientation. You can tilt the quadcopter in a direction just to see where it goes, and once you let go of the stick, it will become straight again.
Horizon mode does let you do tricks, though – if you push the sticks all the way to their extremes, the quadcopter will flip and roll.
For even more docile flight, choose “Angle” mode. In Angle mode, the quadcopter will not bank/pitch more than a set number of degrees, so no matter how much you push the sticks, the quadcopter will only go so much.
I don’t recommend using this mode.
To set up your switches to the modes, you’ll need your battery connected.
Remember my earlier warning!
You should have noted which switch moves which “Aux” channel – so if you wanted to set “Aux1” to activate horizon mode, choose “Aux1” next to Horizon mode in the software, and flick the switch down(mid or all the way, whichever you like). If the switch is correct, you’ll see the little green dot move. Flick the switch back and forth to see how much the bar moves.
Then move the sliders around the range of the switch you wish to assign to that mode. So if the bar moved all the way to the right when you flicked the switch down, moved to the center when you flicked it to the center position, and all the way left when you flicked it back up to default, you could split up the bar into three.
If you wanted to assign it to the center position, move the sliders so they are around the center of the bar. If you wanted to assign it to all the way down, move the sliders so that they are out of the center position range and cover only the down position range.
This way, you could use one three-way switch to activate three modes – one from the up position, one from center, and one from down.
Note that whatever mode you assign to the “up” position will be default, since the default position of your switch is also “up”.
If you don’t assign any mode to a particular range, then it will default to acro(rate) mode.
I usually have acro mode as default and horizon mode for the middle and bottom position of one switch.
This is my “Oh shit!” switch to use in emergencies. I haven’t had to use it yet!
You can also choose to arm the motors with a switch – though it’s completely optional.
Remember to hit save on every page!
Ports(skip if you don’t want telemetry)
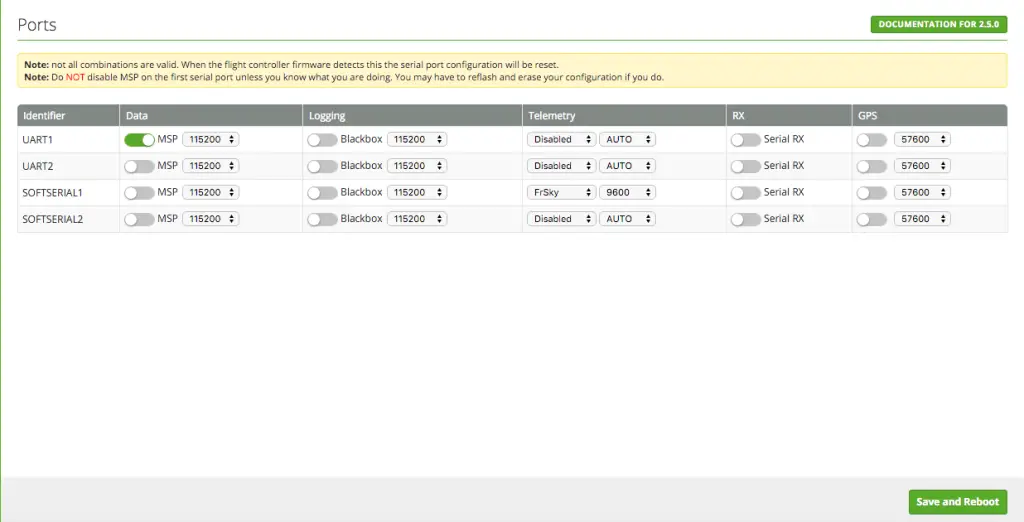
If you want to set up telemetry with a FrSky Taranis and a telemetry receiver, then you’ll need to go up to the “Ports” tab. Provided you turned “Softserial” on in the configuration screen, you’ll see “Softserial1” and “Softserial2” – in the “Telemetry” column of Softserial1, select “FrSky” from the drop down menu and set the rate from “Auto” to “9600”.
Two changes in the CLI(Ignore if no telemetry)
Finally, head over to the CLI. For your Taranis to properly receive battery voltage through telemetry, you’ll have to change one setting, and may have to change another.
The first thing you want to type in is:
set frsky_vfas_precision = 1
save
And the board will save the settings and reset.
If, once you turn on the Taranis and can’t seem to get any telemetry readings(from the Telemetry menu on your Taranis, topic for another post), you’ll have to change one more setting here:
set telemetry_inversion = ON
save
Now, from the Taranis telemetry settings menu, if you select the “Discover new sensors” option when the board is armed, you should get all the data.
Phew! That was a lot to write, but this is a pretty thorough configuration of Cleanflight/Betaflight for your Naze32. If you have any questions or comments, please leave a comment below!
I am trying to set up a naze board with the Radiolink AT9 transmitter and receiver. This is my first time and i am having some problems.
when i click on receiver tab and i move the sticks on the transmitter nothing happens on screen. I have already bound my transmitter and receiver and i am thoroughly confused
Have you connected the receiver correctly to the Naze board?
I have the same problem but with a Taranis plus and X4r 🙁
you are perfect,
i bought naze32 1 weak ago and i could not anything now i did it because of you thank you very much
You are very welcome! Glad I could help 🙂
Can you tell me please? why my cleanflight could not detect the board? When i clicked the ‘connect’ button it does not came out just like you did
Have you flashed the correct firmware that matches your board?
have you uploaded the bootloader by shorting the bootloader pins ?? and then tried connecting???
reset tx settings
You should try soldering the boot jumper to force the newest firmware to load. Instructions are on the bottom of the “Firmware Flasher” page of the CleanFlight app. This is required for F3 boards, but I’ve had to do it on a few F1 boards too.
I have a devo 10 with deviation firmware flashed. It has DSMX, DSM2 can I use this to fly the Eachine wizzard x220?
If you use a DSMX/DSM2 receiver with the Wizard, it should be fine. Get the BNF version, not the RTF one.
I’m having what seems to be a common issue but none of the solutions fit my problem. I have no stick inputs but AUX 1 works .I have a NAZE32 Rev 5 with an AR610. It’s bound and I hooked the receiver up to my first copter’s exact same NAZE32 board (I’m building a second copter or at least trying to) it works perfect so the issue is with the new NAZE32 board. Wiring is the same, setup and firmware is the same. No faults in wiring harness. I tried dumping my CLI from my working controller to my new one but still no dice. I even bought another NAZE32 board suspecting it was a hardware defect but same issue. I’m using cleanflight. That is what my working board is flashed with and works perfect. I tried flashing Baseflight to my new controller and the Throttle and yaw will work, but no AUX, pitch or roll. What could I be missing? I just want my new controller to work the same as my current one so I’m not going to mess with my TX or it will mess with my working copter. It has to be something in my new NAZE32 I must have forgotten to set. Any ideas?
Have you done the channel mapping correctly?
I have the naz 32 and the green light is flashing and beeping and nothing else, when i connect to clean flight and save and upload and connect the battery the motors come on and stay on, the radio control unit is connected but does not drive it, Ido not know what arm is or how to do it
,
Have you checked your channel mapping? Is it correct?
What is channel mapping? how do i know if it is correct
You’ll have to move an axis on your radio and see if the corresponding one moves or not – sorry there isn’t a better answer for a radio like the FlySky. Maybe you’ll be able to find the default channel mapping somewhere online or in the manual.
The channel mapping is basically exchanging the numbers and letters from AETR1234 to make the stick movements correspond to the Aileron(A), Elevator(E), Throttle(T) and Roll(R) channels. Example..you move your stick for the trottle and AUX1 channels on the screen moves then you will have to swap numbers 1 and T by clicking on the AETR1234 part and deleting and entering the correct ones
Thanks for the info but the problem I’m having is every time I plug the battery I don’t hear the motor responding. can you please help maybe I’m doing it wrong somewhere. newbie
Board – Naze32 rev5 full
HobbyKing 20A UBEC ESC
Motor – A2212 1000KV
FLYSKY FS-i6x control, fs-x6b receiver
Matek mini power distribution
i am having issues getting my dx6i connecting to cleanflight motors wont spin up and no tx response on cleanflight i have had it working before but flashed updated firmware and forgot to back up any help please naze 32 rev fc and dx6i with ar6100e rx
Did you change any wiring or just re-flashed the firmware?
You’ll have to turn on Serial RX in ports and also enable the corresponding protocol in the Configuration tab.
Great forum, I have a question? I’m using Naze32 rev6 and hook up on cleanflight. receiver flysky IBUS fs-i6b, fsi6x transmitter. it works on cleanflight, FC, receiver but my problem is when plugging the battery beep sound comes on but all motors are not spinning? I did set up IBUS on transmitter, receiver talks to FC but no signal going to the motors. Is there anything that I missed, sorry newbie here.
Do your ESCs beep and make the tone when you plug in? I’m guessing if you’re applying throttle and the motors aren’t spinning, it is because you have chosen the wrong ESC protocol in the Configuration screen(OneShot, etc), or you have not calibrated your motors.
Please let you do this and set up with FlySky fs-i6?