iNavflight is a fork of Cleanflight which is designed to make the best of GPS and navigation capabilities. Cleanflight and Betaflight don’t have the best GPS capabilities – so some developers decided to fork Cleanflight, keep the same interface, and adapt the code to have navigation.
Since it’s a fork of Cleanflight, iNavflight works on most common flight control boards like the SP F3 and Omnibus F4(my preferred board for now until widespread F7 support will enable multiple UARTs!), to name a few. You can use it for multirotors, flying wings, and planes.
The really cool thing about iNavflight is that you can even install it on a small 5 inch build and still get a respectable GPS fix and position hold!
This post will focus only on multirotors, but there are plenty of awesome resources to check out regarding planes and wings.
iNav supports a lot of flight modes: ALT hold, GPS hold, magnetic hold(quad will respond to stick inputs according to original orientation), Waypoints, and Return To Home.
Here’s some footage I took with a 450 quad running iNav carrying a brushless gimbal. The highest I went was about 25 meters(100 feet or so), and even at that height, it was solid as a rock:
For configuring and flashing iNavflight, you’ll need the iNavflight configurator, which you can install to Chrome from here.
Note: You must have the VCP drivers for your computer to be able to talk to the flight controller. If you use the Betaflight or Cleanflight configurator, you already have the drivers. If this is your first time ever using a flight controller like this, read this guide for downloading the correct drivers.
To flash iNavflight, connect your flight controller to your computer via USB while holding down the BOOT button(or shorting the BOOT jumper, whichever your FC has).
When you’ve successfully connected, the Configurator will recognize a device in DFU mode – which will be reflected in the port selection tab at the top.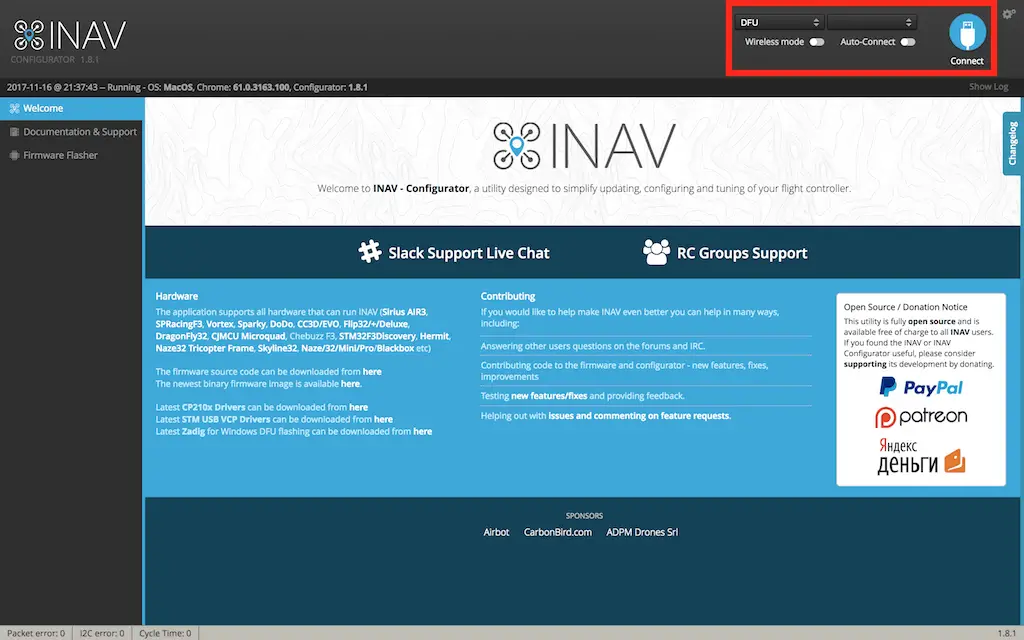
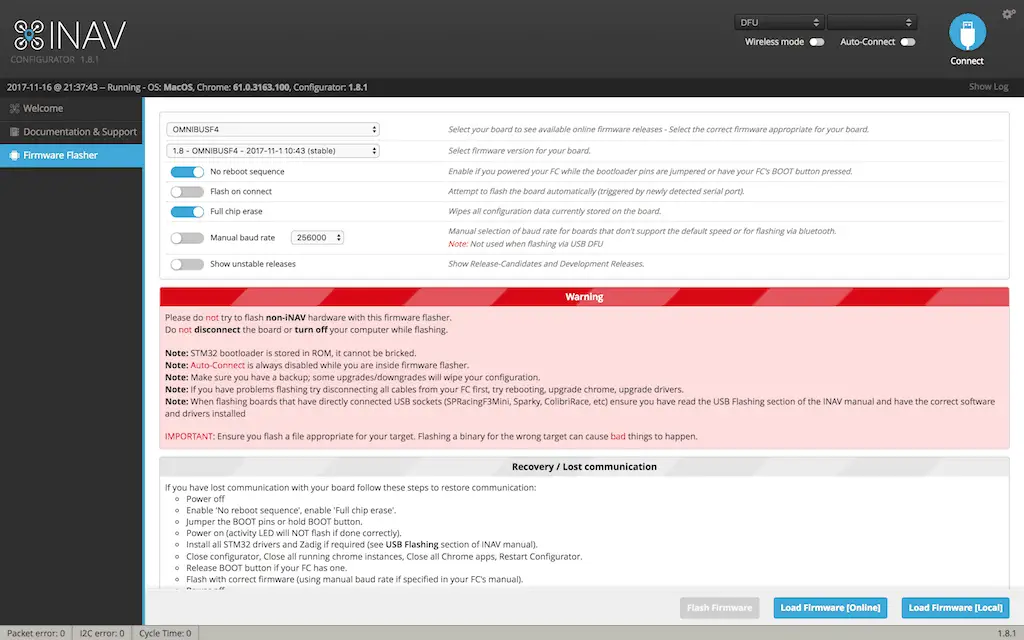
Next, click on the Firmware Flasher tab and select your correct board and the latest release of the firmware, make sure “Full Chip Erase” is selected and click Load Firmware Online.
Once the firmware is downloaded, the Flash option will become selectable. Click it, and wait for flashing to complete.
If all goes well you’ll see a message saying:
PROGRAMMING SUCCESSFUL
At this point, unplug your flight controller, remove the BOOT jumper(in case you jumpered), and plug it in again. You should be able to connect to the board and see settings.
Wiring up your flight controller
For the GPS modes to work correctly, you’ll need to have a GPS, a magnetometer(compass), and a barometer. Technically you can get away without having a barometer, but you won’t be able to use altitude hold – you’ll be able to get a 2D fix and control the height yourself with throttle adjustments.
The barometer must already be built into your FC, such as an Omnibus F4 Pro or an SPF3 Pro.
Your GPS will probably have a magnetometer built into it – if it doesn’t, I still recommend picking up a GPS with a mag built in as you’ll be mounting it fairly high up from the rest of the electronics where it won’t be susceptible to interference.
The GPS/compass will have 6 wires coming out of it.
Note: I recommend the UBLOX NEO-8M GPS/Compass
From the GPS, you’ll have a GND, 5V(or 3V), TX, and RX wire.
Hook those up to a free UART port on your flight controller. If you’re using a serial receiver, then you’ll have two free UARTs – the receiver will use up one of the three.
GND goes to GND, 5V or 3V goes to the respective port(make sure you get the voltage correct, or you’ll see magic smoke).
TX from the GPS goes to the RX on the board, and RX from the GPS goes to TX on the board.
This is because TX transmits, and RX receives – so it has to go out of one and into the next.
Note: F3 and F4 boards have 3 UARTs. Some boards have a virtual UART for the USB – to see if this is the case, you’ll have to connect it to the configurator, go to the “Ports” tab, and see if the first port is a USB VCP. If it isn’t then you only have 1 free UART after USB and your receiver. This means you’ll have to have some means of disconnecting whatever you’ve hooked up to the UART that uses USB whenever you want to connect to the computer.
The compass will plug into the I2C pins – labeled SCL and SDA. In this case, the wires will match – SCL goes to SCL and SDA goes to SDA.
Configuring your flight controller
iNav uses much of the same interface as Cleanflight and Betaflight, so if you have used those before, the interface will look very familiar. There are just a few minor changes which we have to address.
Note: If you are familiar with Betaflight and Cleanflight, feel free to skim, but make sure you go through the Setup Tab, Advanced Tuning Tab, and Modes tab walkthroughs in detail.
Configuration tab: Setup
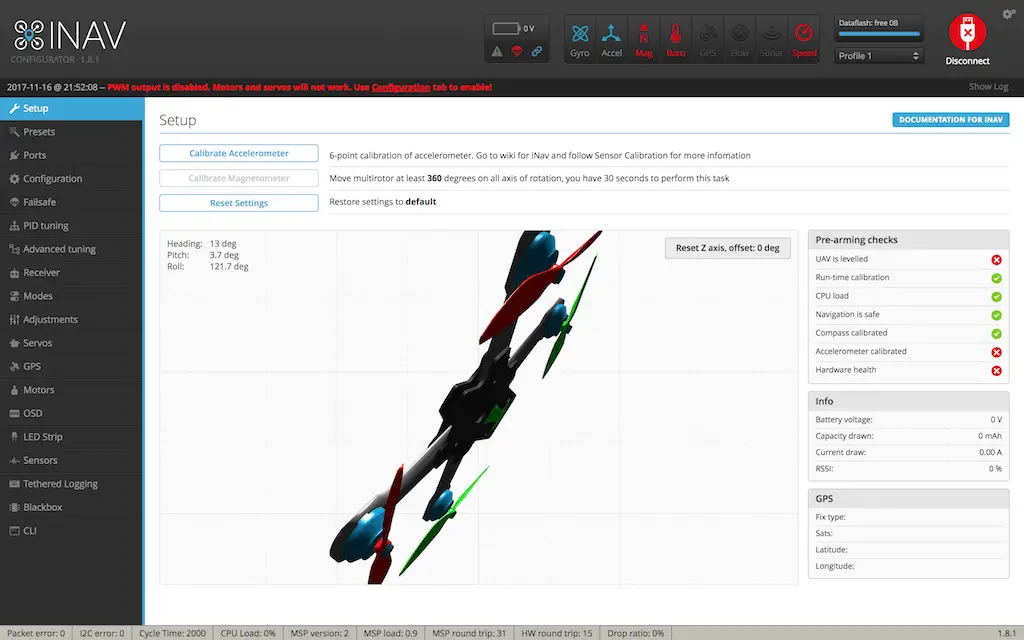
As you can see, the Setup screen is quite similar to what you’re used to, except there’s a few new sections on the right: pre-arming checks and GPS.
Pre-arming checks are safeguards that are built in that don’t let you arm unless those steps are completed. Most of my checks are red in this image because I am using a spare board I had lying around to show you how to flash and setup from the start – there are no peripherals plugged into the board!
Under pre-arming checks, you’ll notice that Accelerometer calibration is red – this is because iNav has a special type of calibration that you must do.
The calibration is something we’ll do last after completing the build, so we’ll revisit at the end of the post. For now, this is just to familiarize yourself with the screen.
Configuration tab: Presets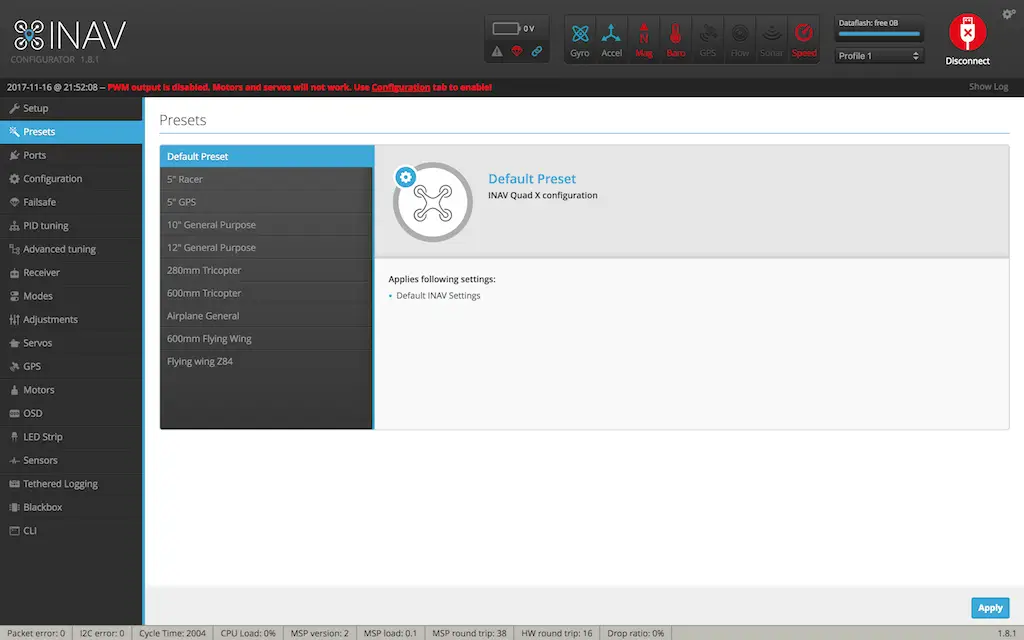
iNav has a bunch of presets loaded into the configurator which will change some basic settings like mixes, rates, and filters depending on the type of setup you are running.
It’s quite useful to choose a preset – we’ll be adjusting some settings later on, anyway.
Configuration tab: Ports
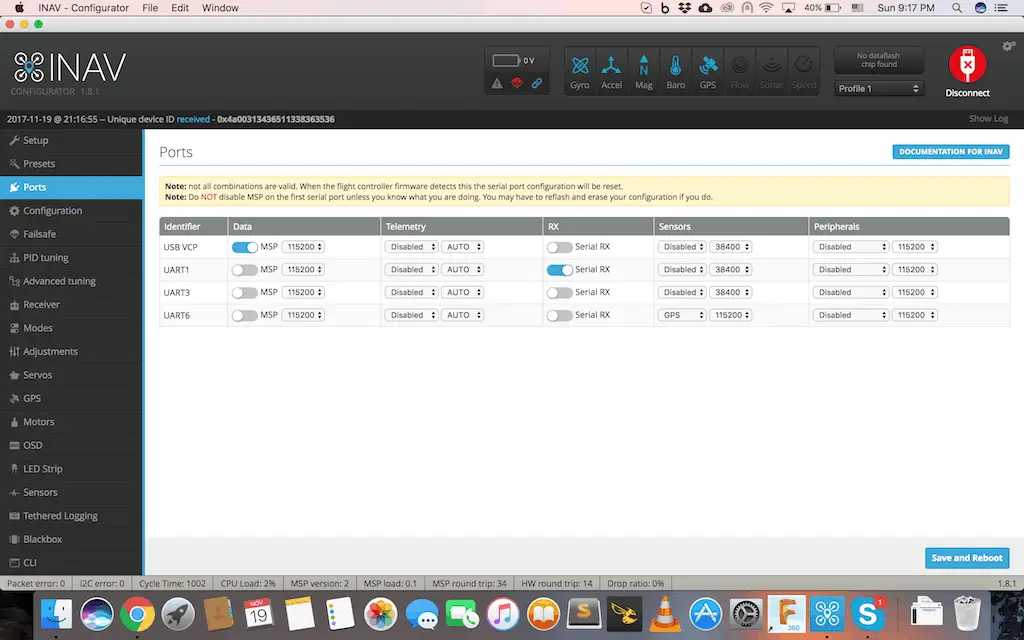
The ports tab is quite critical to make sure your setup is running correctly!
Here, you’ll assign your peripherals to whatever UARTs you soldered them up to.
You’ll have one UART for Serial RX(if you’re using SBUS or CRSF, and there’s no reason you should be using anything else!), and one UART for GPS.
If you’re using an F3 board and wish to use a Bluetooth module, there is a stone age way to go about it. As we saw earlier, you’ll use up the UART that is shared by I2C when you hook up your compass, so you won’t have the 3rd UART free – unless you use a PPM (yikes) receiver, in which case the UART used by the serial receiver will be freed up.
For your GPS, choose “GPS” from the sensors drop down in the correct UART you’ve attached your GPS to.
Once you enable GPS, the icon at the top will go red or blue. If it’s red, it means your FC has not found the GPS yet – this simply indicates that you’ve either wired it incorrectly, or have not set it up properly – which we’ll get to in the Configuration screen next.
Configuration tab: Configuration
(Yes, I know…sorry)
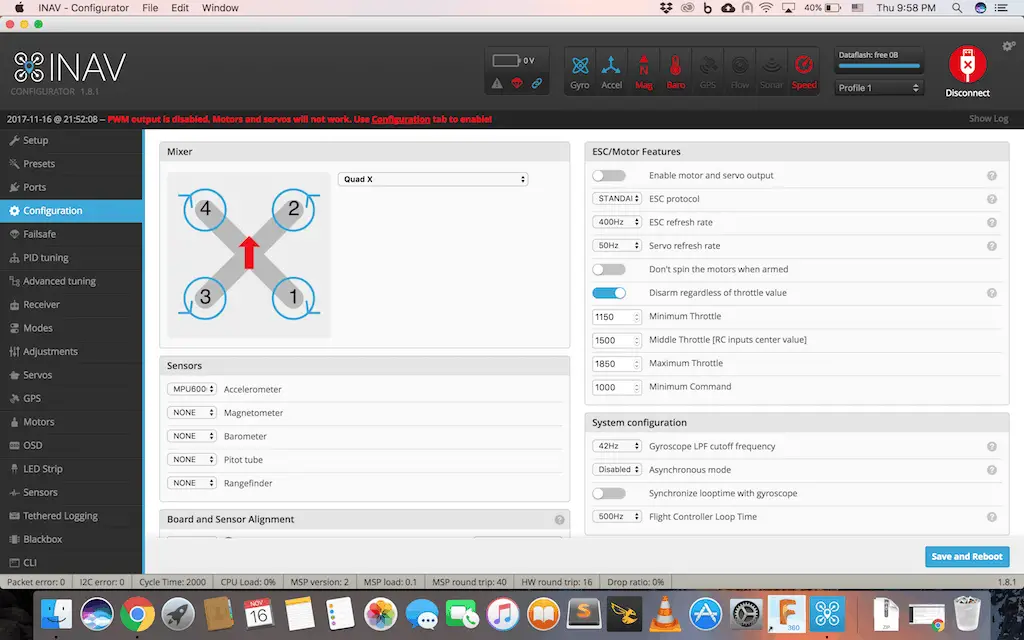
In the Configuration tab, the first screen you see is the mixer – if you used a Preset from earlier, this should already be correct.
Under the Mixer, you have the Sensors tab. Here, you’ll have to select all of your peripherals. Most likely, your firmware will already pick them up – but if any of the sensors are showing up red at the top of the screen, you may have to do a bit of process of elimination to get the right one. Most likely just selecting AUTO from each menu will do the trick.
For a multirotor, you’ll only need the Accelerometer, Magnetometer, and Barometer. Select auto for each, hit save and reboot, and see the red icons magically turn blue.
Under ESC Motor Features, the first toggle says “Enable motor and servo output” – unless this toggle is checked, your motors will not spin up! This is fine for now, but make sure you enable this before your final setup and maiden flight.
You can choose your ESC protocol(go for Multishot if your ESCs support it – BLHeli_S ESCs certainly do), change the refresh rates, and change your other settings.
Leave min throttle as it is for now, but you’ll have to come back later to change the value after we’ve calibrated the ESCs. iNav does not support DSHOT yet so we still have to calibrate ESCs.
Finally, under system configuration, you can adjust the cutoff frequency and adjust looptime.
Now scroll down.
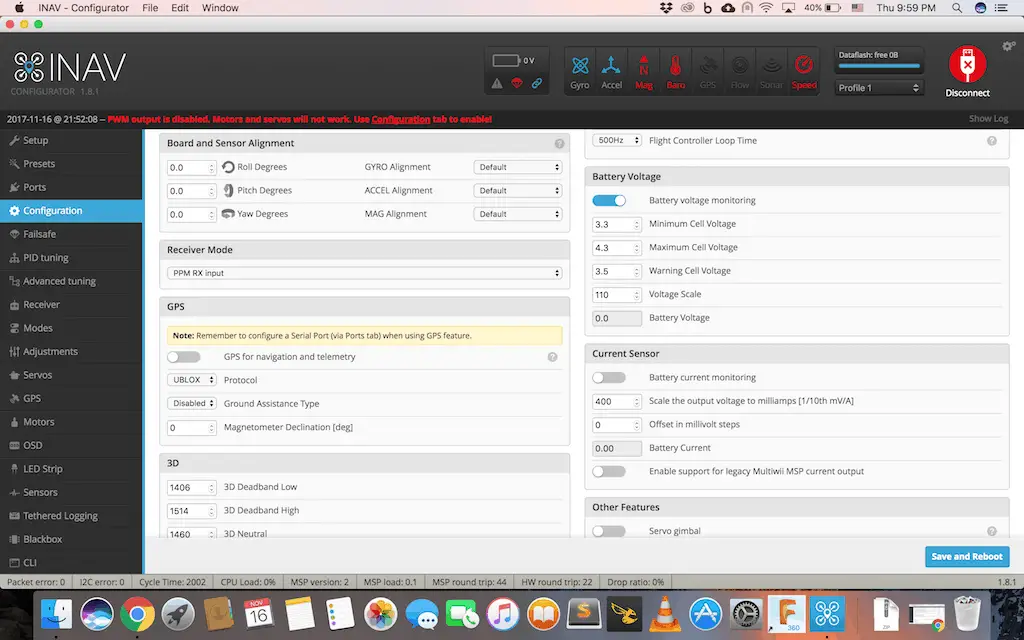
Here, you can adjust the board and sensor alignment. You’ll need to do this if your board is not mounted with the arrow facing forward. If it isn’t facing forward, just adjust the YAW degrees to match your setting.
You may have to touch MAG alignment after calibrating your compass, but we’ll come back to that during our final calibration and setup.
Under that, you’ll see the Receiver tab. Select the type of receiver you are using, and the correct protocol: ie Serial and SBUS, etc.
Under that, you’ll see GPS. Provided you are using a GPS module, enable the toggle, and select the correct protocol. Most common protocols are UBLOX, but check your GPS module to make sure.
The next feature is Ground Assistance type- from this menu, you can select the continent you are in, or set it to auto as the GPS knows where you are anyway!
Finally, there’s the Magnetometer Declination setting – depending on where you are in the world, your compass may need to be adjusted slightly to give a correct reading.
Head over to this website and get the correct declination for your city, and enter that number here.
On the right of the screen, you can adjust battery voltage and current monitoring.
Now scroll down…
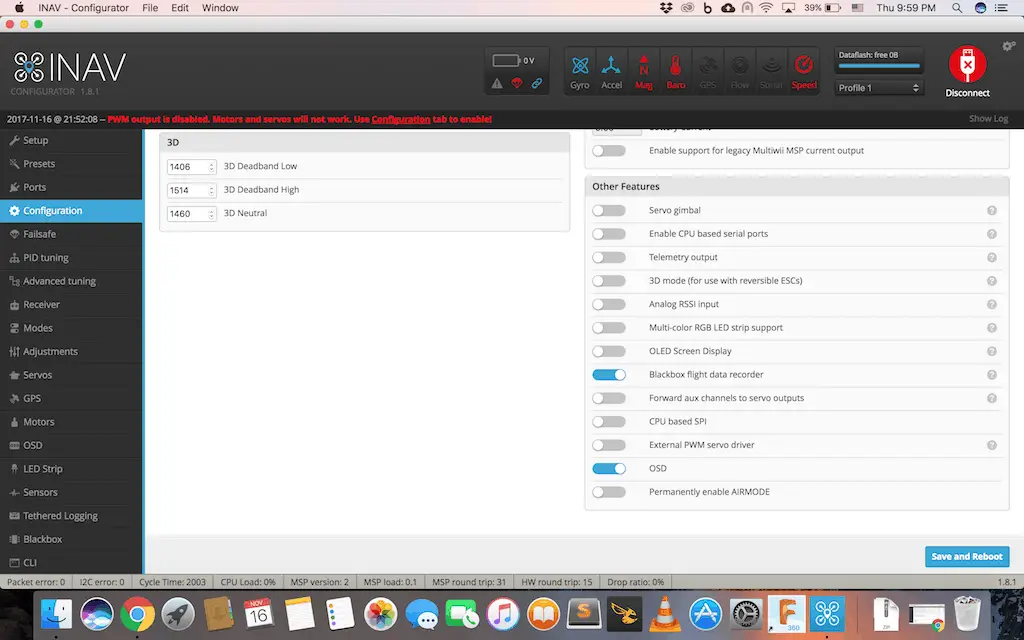
Under other features, enable the features you need. At minimum, you want to enable
- telemetry if your receiver supports it
- OSD
- Airmode(as a safeguard in case you cut the throttle by mistake)
Click save and reboot.
Configuration tab: Failsafe
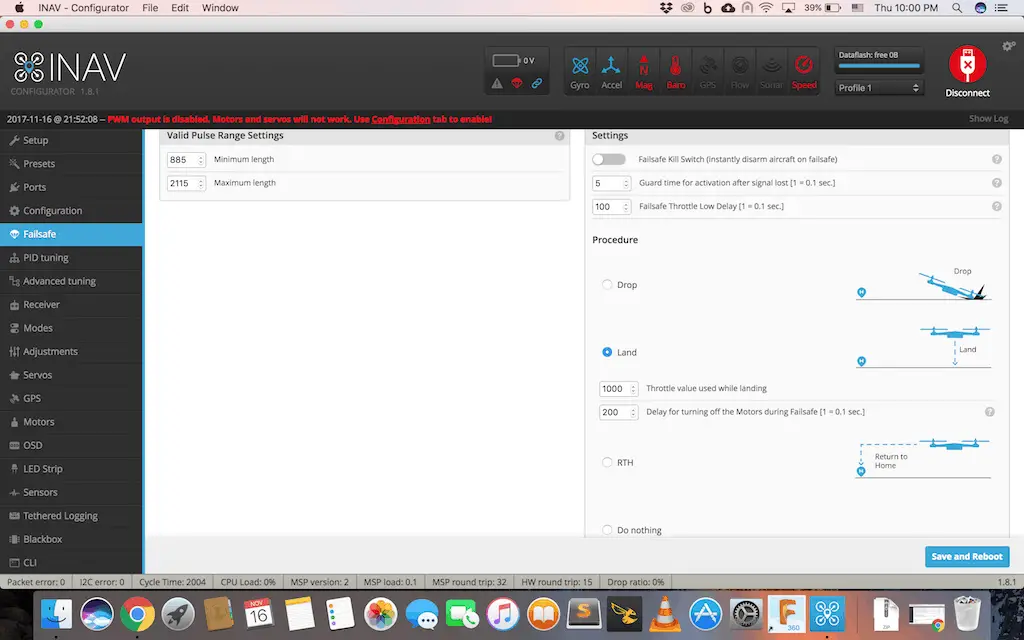
The next tab is the Failsafe tab. This is CRITICAL! Make sure you set this up. You have four choices in failsafe:
- Drop: Your copter kills all inputs and plummets to the ground
- Land: Your copter will stabilize itself and do a controlled descent towards the ground(you’ll have to configure the throttle value and delay for motors off)
- RTH: Your copter will come back to the spot it was armed in(provided you had a good GPS fix)
- Do nothing: Self explanatory, your copter will continue flying in the direction it was going in until it crashes into something or the battery runs out
Ideally, you’ll want to choose RTH – return to home – as that’s the whole point of using iNav! However, if you’re setting this up on a race quad or a smaller build with tighter battery capacity, you may wish to employ land or drop.
Configuration tab: PID tuning
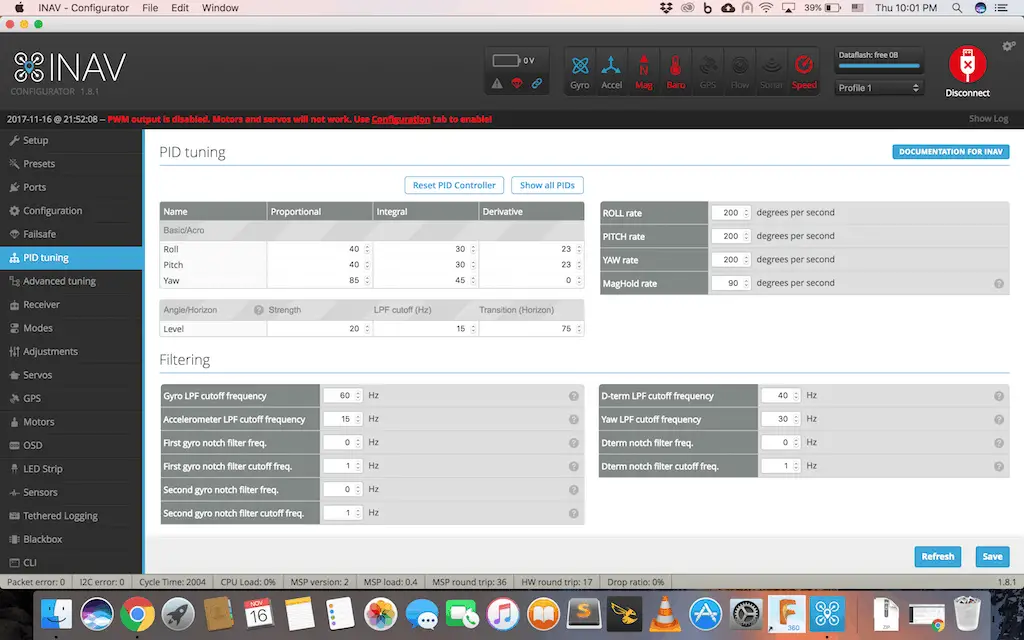
The PID tuning tab is also quite self explanatory. During initial setup, you don’t want to touch any settings here – except maybe the rates if you are flying a race quad.
Configuration tab: Advanced tuning
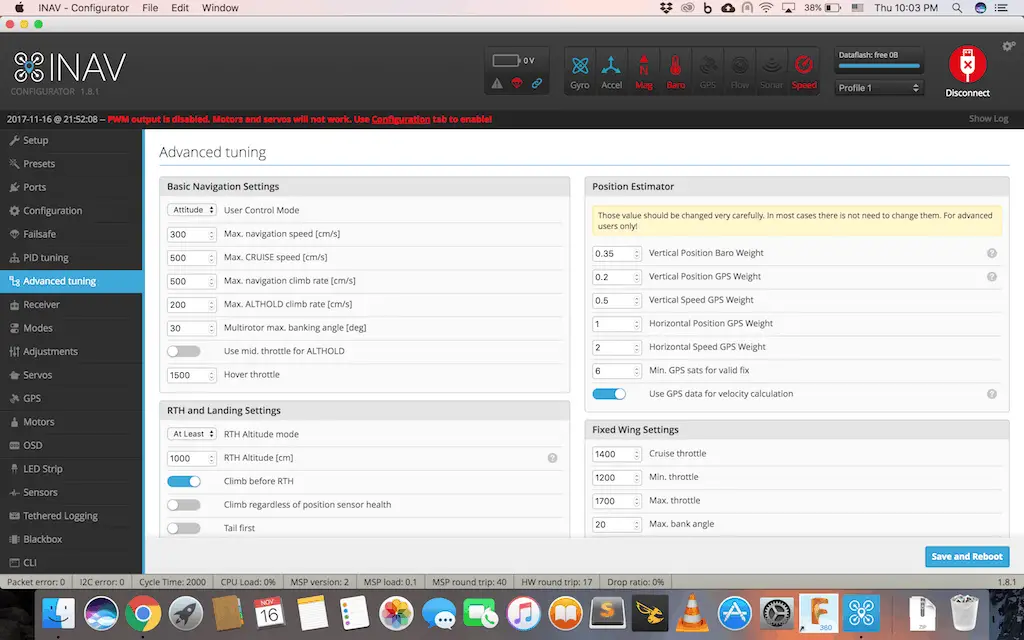
The advanced tuning tab is for changing more specific GPS and navigational settings.
Under basic navigation settings, you can adjust the settings to change the behavior of your copter in the navigation modes – but I’ve left mine at stock right now.
The only thing you’ll want to change is the Hover Throttle value which you’ll have to determine by actually flying the copter without any nav modes turned on and see what throttle is required to maintain a hover. Then enter that number(even rough estimate is fine), save, and test the ALT hold mode to see if the copter is able to maintain altitude or not.
Below that, you have RTH and landing settings – these are also quite self explanatory, and I have left mine at stock for now. In RTH, the copter will first climb, turn around to face the home direction, fly back, turn into original orientation, and then land.
This is with default settings – you don’t really need to change anything on this screen for the time being.
Configuration tab: Receiver
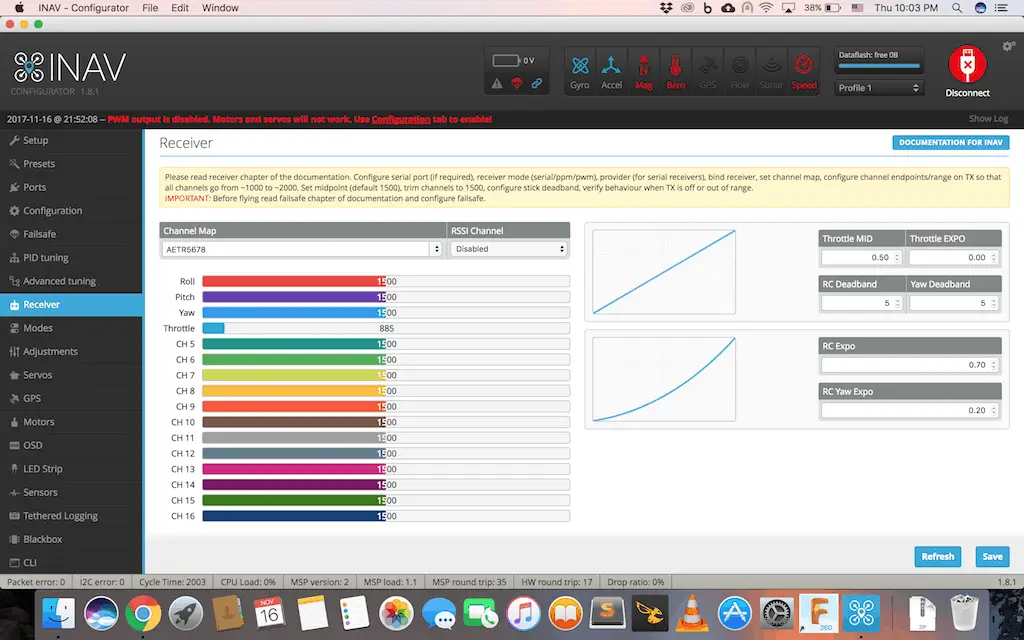
The receiver tab is pretty much the same as the receiver tab in CF and BF. Provided you’ve bound your transmitter and receiver, and configured your receiver correctly in Ports and Configuration, you should be able to see the bars moving according to your transmitter.
Please note that the channel map here is a bit different: AETR5678 means channels 1-4 are AETR, and the other 4 channels are 5678.
So if you were using a Taranis, you’d set it to TAER5678.
If you’re unable to change the channel map, your receiver probably doesn’t work with iNav…yet. I had this same issue when trying to use my XM+ receiver. I ended up having to set it up using a Crossfire micro receiver.
Configuration tab: Modes
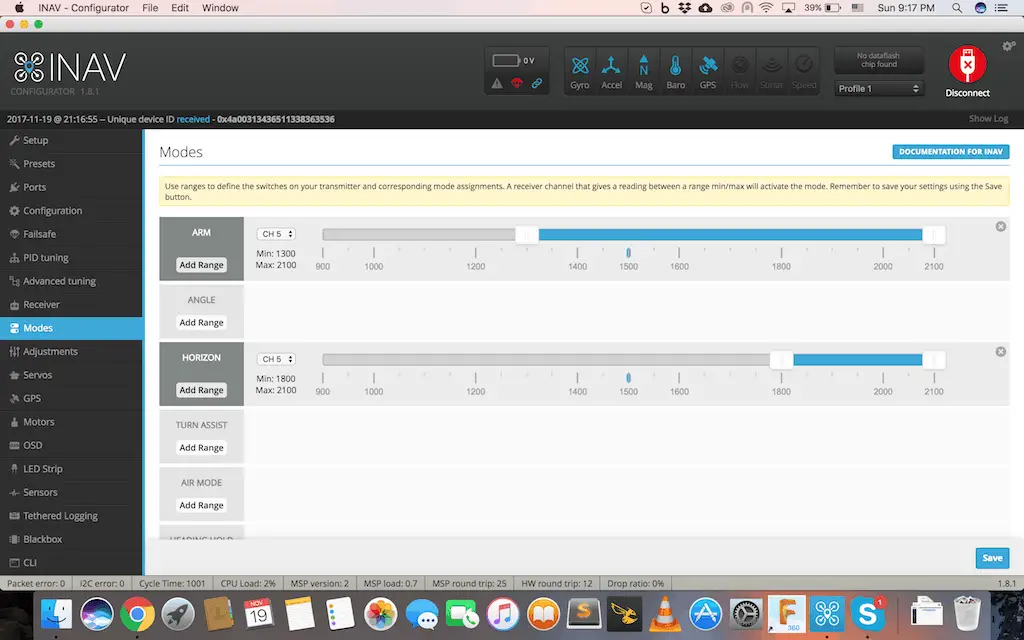
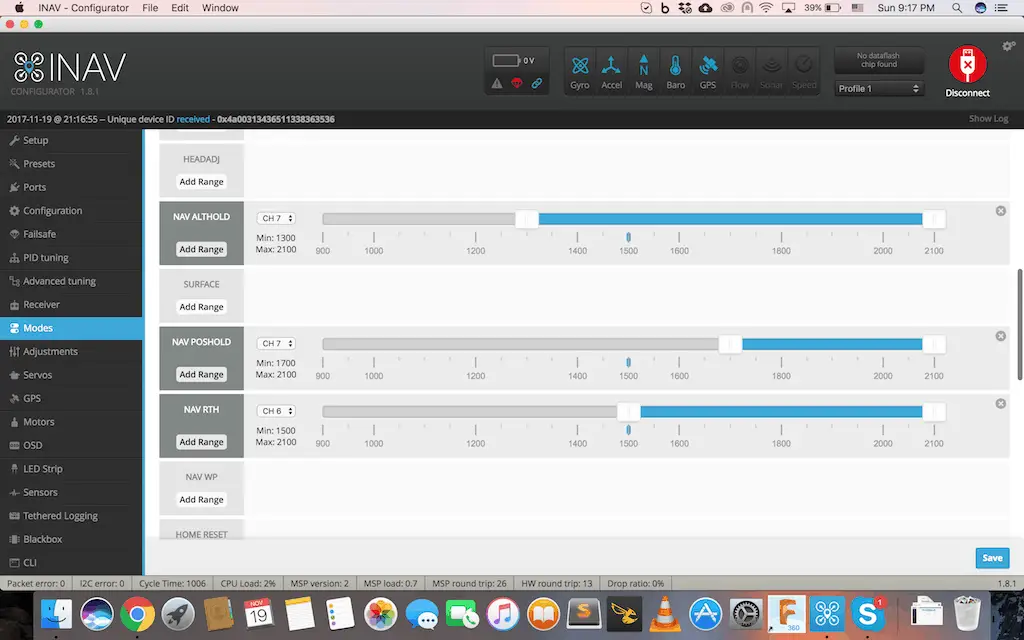
The next tab to set up is the Modes tab. Here we’ll assign all of our flight modes to switches on the transmitter.
I would recommend you have at least two, if not three switches configured so you can utilize all of the flight modes correctly.
I’ll take you through my recommended setup, in which I’ll only talk about the modes that I use – but you’re more than welcome to refer to the documentation to read up on the other flight modes, too.
Here’s how I have set my quadcopter up:
- A three way switch is assigned ARM from the middle to the end values
- The same switch is assigned Horizon at the end values(In horizon mode, the quadcopter will level itself if you let go of the sticks, but you can bank as much as you want – it is a mix of stabilized and aggressive flying). You can also use ANGLE if you want, which will stabilize the copter and limit bank angles.
- A second three way switch is assigned ALTHOLD from the middle to end values(you won’t see ALTHOLD if you don’t have a barometer). ALTHOLD will make the quadcopter hold its altitude, but it can drift from here to there
- The same switch is assigned NAV POSHOLD(you’ll only be able to see this if you have GPS configured) at the end values. This means that ALTHOLD and POSHOLD are both enabled, giving you a 3D lock.
- You can also assign HEADING HOLD to the end values of the same switch which will hold the yaw position too, for a really locked in copter.
- The last switch I use is a two position switch with NAV RTH assigned to the end values. RTF is Return To Home, where the quadcopter will fly back to the point it was armed from.
One more mode you may like to enable is NAV WP, in which you can upload waypoints to your copter using EZGUI and have the copter fly the entire route.
Configuration tab: GPS
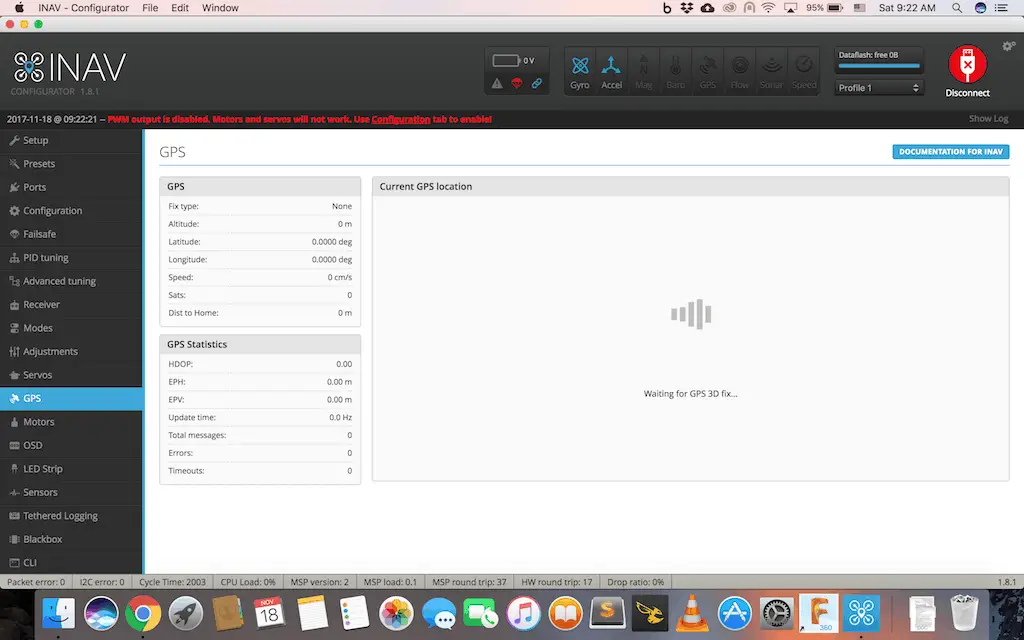
The GPS tab will show you the stats of your GPS lock. Here, you can check if you’ve actually configured your GPS properly.
If the “Total messages” value under GPS Statistics is increasing constantly, that means your GPS is working. In the top box, where it says GPS, the Sats value will indicate how many GPS satellites your chip has locked on to. For safe and stable flight, I recommend at least 9 or 10 satellites. The more your craft can lock on to, the more accurate it’s position holding capability will be.
Configuration tab: Motors
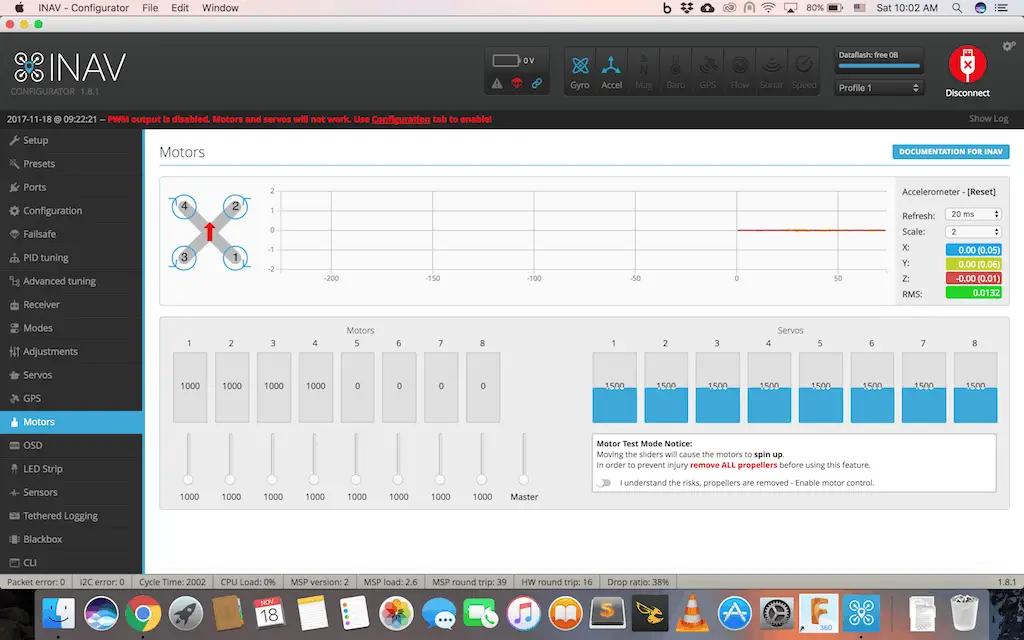
The motors tab is where you’ll calibrate your ESCs, find min_throttle, and check that the motor directions are okay.
To calibrate ESCs, make sure the propellers are off, flick on the “I understand” toggle, raise Master to full value, and plug in your battery.
The ESCs will go through their tones. Once the tones are done, lower master to zero, and the ESCs will finish their tones. Now unplug, plug in again, and raise Master very slowly until the motors are spinning comfortably.
Make a note of the value this is at.
You’ll also want to make sure the motors are spinning correctly – if they’re not, head over to the BLHeli configurator and change the motor orientations until it’s correct.
Now head back to the Configuration tab, and change Min Throttle to about 20 points greater than the value you noted earlier. Hit Save and Reboot.
Configuration tab: OSD
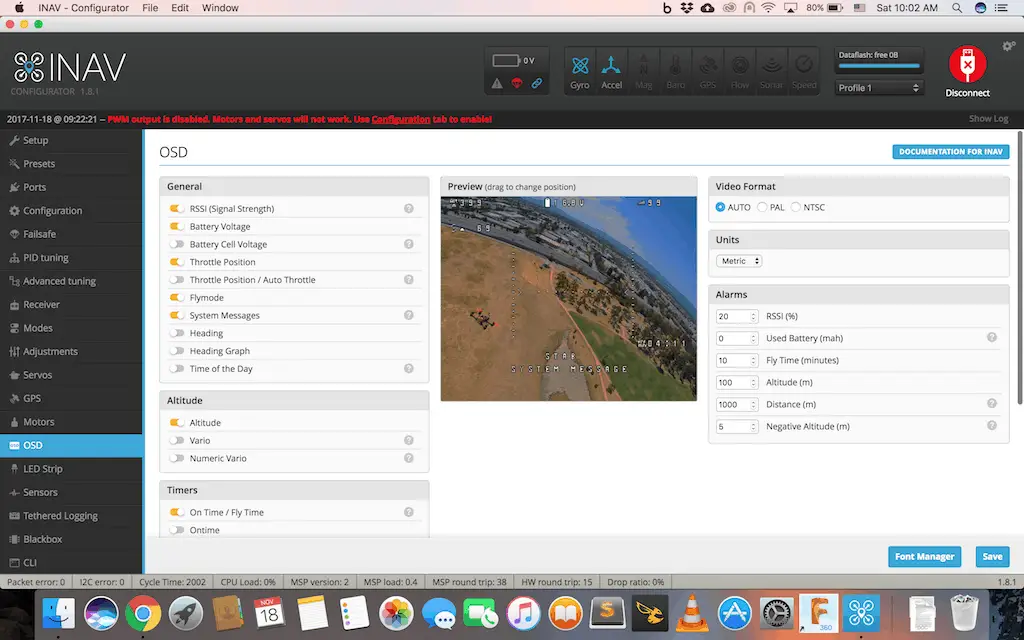
You can configure the OSD if your flight controller supports it. There’s a whole host of features you can choose to display – what you want to show is really up to you, but at minimum, I’d keep
- Battery voltage
- Flymode
- Altitude
- On Time/Fly Time
- Sats
This is all the essential data you need – you can also have Longitude and Latitude enabled so you can go look for your model in case it gets lost.
Calibrating sensors
Before you can start flying, you must do two vital calibrations: the accelerometer calibration and the magnetometer calibration.
Accelerometer calibration
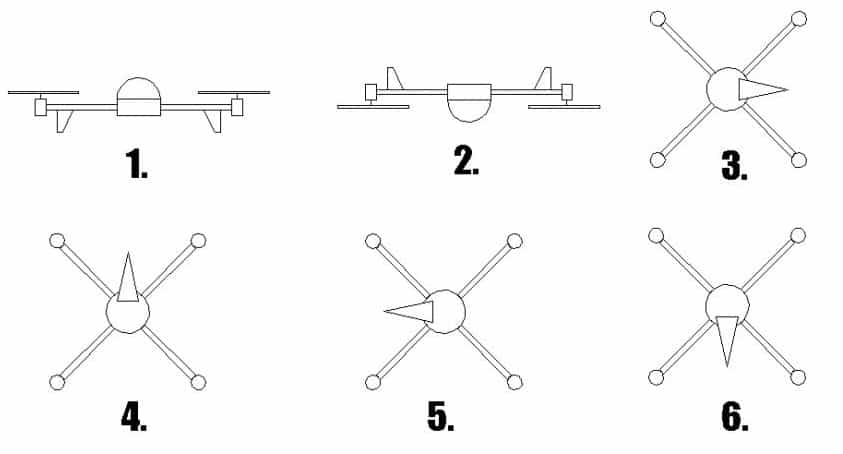
To calibrate the accelerometer in iNav, you have to go through a six step process.
- To start, keep your copter flat on the ground, and press the “Calibrate Accelerometer” button on the Setup screen. Once it’s done, there will be a SUCCESS message at the top of the screen in green text.
- Now flip the copter upside down and press the “Calibrate Accelerometer” button again. Wait for success confirmation.
- Now hold the copter perpendicular to the ground with the front of the copter facing right. Click the button, wait for confirmation.
- Continuing to hold it perpendicular, now face the copter straight towards the sky. Click the button, wait for confirmation.
- Now face the copter towards the left, continuing to hold it perpendicular to the ground. Click the button, wait for confirmation.
- Finally, keeping it perpendicular, face the copter to the ground, click the button, wait for confirmation.
After these 6 steps are completed successfully, calibration is done. Don’t worry if you don’t get the position of the copter exact each time – just get it as close as possible to 90 degrees from the last position.
Use this diagram from the Wiki as a reference.
To confirm, head to the CLI, type dump
And check if the values accgain_x, accgain_y and accgain_z are NOT 4096
Additionally, the values acczero_x, acczero_y, acczero_z are NOT 0.
If either of those are not true, you’ll have to repeat the calibration process.
Magnetometer calibration
To calibrate the magnetometer, click the Calibrate magnetometer button, and within 30 seconds, rotate the copter 360 degrees along all 3 axes. It doesn’t have to be exact!
Just make sure you are doing this far away from magnetic interferance(large metal objects, high levels of electric current).
To confirm, head over to the CLI, type dump
And look for the values magzero_x, magzero_y and magzero_z are no longer “0”
If that is the case, you’re good to go! In the Setup screen, just check what the “Heading” of the copter is and if it is in fact the direction it’s pointing in!
0 degrees is N
90 degrees is E
180 is S
and 270 is W
Going for your first flight
Now that everything is set up, it’s time to go out and FLY!
It’s a good idea to have your laptop out with you for the first few flights.
Before taking off, you need to make sure you have caught onto enough GPS satellites.
You can do this by:
- Connecting your quadcopter to the computer and opening the GPS screen in the iNav Configurator
- Having your OSD set up to read out GPS satellites so you can see the number in your FPV feed
- Having telemetry set up and showing the number of satellites on your radio screen
Although you only need a lock on 6 satellites to arm and fly successfully, you do want to have at least 10-11 for a nice stable flight.
Once you have enough satellites, go ahead and ARM your copter. At this point, don’t use any of the GPS/ALT modes yet – just stay in Acro mode or Horizon/Angle and see what percentage throttle you are maintaining a hover at. If you need to, adjust the tune first.
Convert percentage into the actual value by:
50% throttle would be roughly 1500 throttle
60% throttle would be roughly 1600 throttle
…and so on
Land, disarm, unplug, and connect the copter to your computer. In the Advanced Tuning screen we saw earlier, change the Hover Throttle value to reflect the number you noted.
Now save and reboot, disconnect, and prepare for another flight. Make sure you get at least 10-11 satellites.
Arm, bring the copter to a hover, and flick the mode into ALT HOLD.
Now let go of the controls and see if you copter is more or less maintaining altitude. It will drift back and forth and side to side, but altitude should remain more or less stable.
Now flick into GPS HOLD, and the copter should maintain a 3D fix now. Make sure you had ALT HOLD and GPS HOLD both enabled as we saw in the screenshot before!
Congratulations!
Now it’s time to play with RETURN TO HOME.
Fly the copter away a little, maybe 50 feet or so, and flick the Return to home switch. Keep your hands on the radio just to be safe, but wait for the copter to come back to you.
With default settings, the copter will get to an altitude of 10 meters, turn around to face home, fly home, turn around to original orientation, and land.
Play with return to home a couple of times and make sure it flies back to you.
Once you’re satisfied, you’re good to go!
Enjoy 🙂
Hi.
I’m working on a project with naze32, Taranis x9d+ and d4r-II. Using Cleanflight it was ok, except the gps.
Now i changed to iNav and can’t set my radio anymore. Tried AETR1234, TAER5678… but nothing! As you told above, maybe the taranis does not work with iNav.
Would like to go back to betaflight, but can’t write the firmware in the naze anymore. Only the iNav firmwares.
Having the same problem with my drone.
If i set the mapping to 87RTAE56 i get my channels for the sticks working, but my aux 5 and aux 6 channels are gone. I ordered a PPM receiver to look if this fixes my problem. Now using a Naze32 with TGY-IA6 receiver
Hello
can you help me with my problem?
I can not start resetting the GPS position, I connected the HOME RESET and ANGLE-does not work – home reset.
yet the NAV POSHOLD + NAV ALTHOLD connection, where should I find NAV ALTHOLD?
Hi if I have d-shot esc’s one esc protocol should I chose?
Any will work, DSHOT ESCs are backward compatible
I fly Betaflight but just doing some free-style on my own mostly (not racing). So moving to iNav (which I’ve just discovered) seems like a great idea to get GPS hold and return to home functionality. Would there be anything I would miss from Betaflight if I moved to iNav?
iNav just won’t fly as snappy and crisp as Betaflight without a LOT of tuning. Also you’ll miss out on the Betaflight Super Rates and Expo.
My best suggestion would be to save your Betaflight CLI dump somewhere, flash iNav, try tuning it, and if you don’t like it, you can always go back!
If you fly very aggressively you may not find iNav that crisp. But if you fly long range and are just coasting, it’s definitely worth a try.