Naze32 is one of the most popular flight controllers among FPV drone racers because it’s small but powerful (based on 32-bit STM32 processor running at 72MHz). Right now, you can find it at rev6 version, which comes with some improvements over older ones, such as moving the USB board to the side for easier access and having an integrated SBUS inverter.
I really like the Naze32 FC because it is easy to customize and set up according to your specific needs. However, since older versions (such as rev5 and lower) don’t natively support SBUS (you need an inverter for this), many new flyers tend to avoid it.
So, if you want to do an SBUS and Naze32 setup, I put together a guide to show you how to make the FC understand the language. For more guides including the Naze32 FC, have a look here.
Why SBUS?
While a CPPM or PWM protocol is acceptable on regular drones, when it comes to speed and reaction time, the SBUS is better. For instance, the first two protocols have a delay of 60 to 80ms, when SBUS only has 10 to 20ms delay, which is extremely important in the drone racing niche.
Another reason is represented by the number of channels it allows between the receiver and the flight controller (up to 16).
Furthermore, one S.Bus cable can carry signals to a wide array of channels (depending on the transmitter’s capacity). This way, you no longer have to worry about plugging the wrong servo in the wrong channel, because the signal knows where to go.
Finally, SBUS is found on the Frsky X4R-SB receiver, which is quite popular, especially among racers. As such, the setup below is between these two elements (the Frsky receiver and the Naze32 FC).
SBUS and Naze32 Setup
For this setup, you will need the Frsky X4R-SB receiver (or another receiver that’s compatible with the FC), the Naze32 board, a converter cable, and a soldering iron. Of course, you also need the transmitter closeby and the possibility to connect the Naze32 with Betaflight.
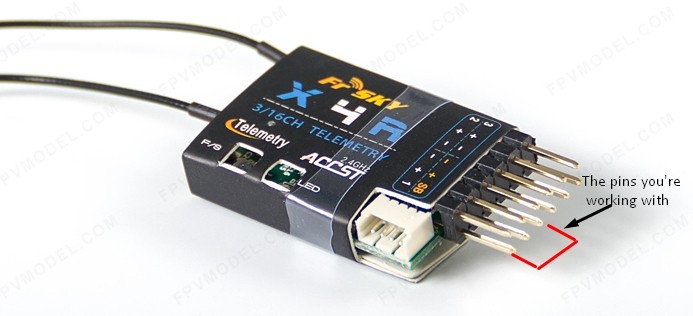
Start by connecting the short end of the converter cable to the receiver (use the second row of pins, with the receiver facing you). Connect the white wire to the SB pin, the red to the positive pin, and the black on to negative.

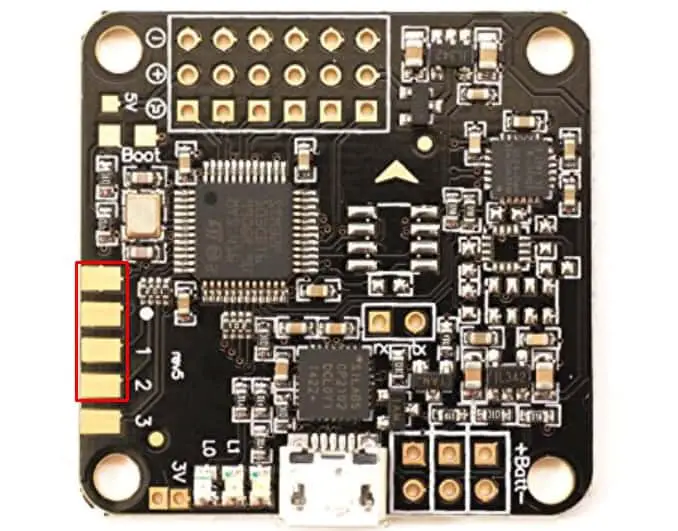
Next, connect the long end of the cable to the Naze32 board (the top row of pins, on the left side of the board). Keep in mind that the unlabeled pin is the negative.
Continue by removing the white wire from the servo cable and use it to the fourth pin on the board (under the three you just use). To make the connection, flip the board and use some solder to fix it in place. Basically, the signal goes to pin number 4 on the board.

To see if this works, connect a BEC to the receiver. This, in turn, will power up the flight controller, so you should see a light on the board. If everything looks OK, bind the receiver with the transmitter following the provided instructions (make sure to select 1-16 on channel range).
Now, it’s time to connect the flight controller to Betaflight and update the firmware. Go to Ports and under RX check the Serial RX checkbox, then click the Save and Reboot button. Next, go to Configuration to enable the RX_SERIAL feature and choose SBUS from the list with Serial Receiver Providers. Click on Save and Reboot, and once the reboot takes place, check if the settings have changed.
Now, to make sure everything is working, go to Receiver and see if anything changes when you move the switches or sticks.
If you want to see a similar setup, have a look at this video tutorial (the connection is made with an X8R receiver and a Naze32 rev6):
Wrap Up
I hope my guide helps shed some light in this SBUS and Naze32 setup! As you can see, it’s not that complicated, but you need to be a bit used to working with solder and circuit boards. If not, I recommend that you practice first because the Naze32 is a small and delicate board, and you don’t want to ruin it (even though it’s not that expensive).