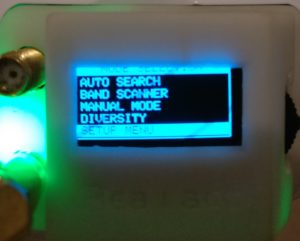
The guys at Banggood were kind enough to send me this module for review. A big thanks to them!
Diversity receivers can greatly increase your FPV feed and range. The way diversity receivers work is that they have two antennas attached to two receivers – and the algorithm seamless switches between the two video feeds, depending on which one is better.
If you use two different antennas – such as one circular polarized and one patch, the CP antenna picks up clean signals from all around you, and the patch antenna can get a good signal in a single direction(wherever it is facing), increasing your range.
Diversity is not a new concept – the radio receivers we use that have two antennas are also diversity receivers, which is why those with two antennas like the FrSky XM+ have greater range than those with just one antenna, like the FrSky XM.
Earlier, having a diversity FPV setup was a rather cumbersome affair – diversity receivers were rather big and clunky, and you’d have to set up a ground station to mount the receiver on, and then plug your goggles into the receiver. The whole portability factor of small goggles would get destroyed, since you’d have to lug around a tripod with more FPV gear on it.
Recently, many manufacturers have come out with small diversity modules that plug into the module bay on FPV goggles such as the Fat Shark Dominator and Attitude series. These tiny receivers do full diversity, and they are only slightly larger in size.
They came out in two types – one where the two receivers are separate and attached by a ribbon cable, so you’d have to mod your goggles a little to fit both in, and the other where both receivers are on the same module, so just one thing goes into your goggles.
There are some expensive options out there like the Furious D receiver from Furious FPV, but there is a great budget option as well: The RealACC RX5808 is an open source diversity receiver that fits in Fat Shark goggles that have module bays.
Setting it up
The package I received contained the module itself, and Banggood also sent a patch antenna, a small 45 degree SMA connector, and a 3D printed cover for the module.
When I opened it up, I was surprised to see some double sided tape in the box, but it was clear why they sent it – the screen on the module was a little loose, so the tape was useful to stick it on!
The module itself is pretty simple – there is a screen, a little clickable wheel on one side, and two connectors for two antennas on the other side.
I just slid the module into the module bay and snapped on the 3D printed cover – you can choose not to use the cover, but I live in a very dusty place, so I decided to use the cover. The cover is a little tricky to get on, but a little wiggling and coaxing and it (almost) snaps snugly into place.
The menu is fairly simple and straightforward to navigate. You can choose your band/channel manually or auto scan. You can also choose to turn diversity on or off.
In the setup/configuration menu, there is an option to calibrate RSSI – this is an important step.
How to calibrate RSSI on RX5808 diversity module
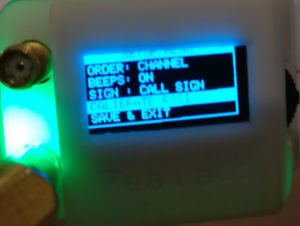
To calibrate RSSI, head into the menu, and then select “Setup Menu”.

In the setup menu, there is an option for “Calibrate RSSI”.
Note: apologies for the bad photo. By the time I could focus the camera, the damn thing would go back to the home screen, so I had to act quickly!
Make sure your FPV transmitter is on(with an antenna obviously) and about six feet away from your receiver. You also shouldn’t have any antennas on your RECEIVER.
Once you select Calibrate RSSI, the receiver will go through all the bands a few times and you’ll see bars on the screen when the signal is strong. It’ll do it a couple of times, then automatically exit. If that happens, you’ve done it correctly and your RSSI is calibrated.
Flight footage
I was actually not able to get really satisfactory test footage. The ground that I fly at regularly has become unusually saturated with RF interference, and as a result, my radio range drops very quickly, and my FPV feed is also really messed up.
As a result, I was not able to do a very good range test for fear of losing RSSI and crashing somewhere I could not recover my quad. There is one other field which is 2 hours away from my home – this field is very open and away from buildings, so I hope I can go there some time and do a better range test.
In the meantime, I tried flying around the perimeter of the football pitch, first with just one antenna, and next with both antennas. I’ve tried my best to sync the videos, but there was a little difference in speed as I went around the field. Still, you’ll be able to tell as I pass obstacles how the feed is.
It’s not the best on both – but that’s because of the interference. There are lots of apartments around so I’m suspecting it’s the WiFi and cordless phones that are messing with the feed.
Updating firmware
You can also update the firmware to get 48 channels instead of the stock 40 channels. Updating firmware will also let you use your own splash screen. I have not done this myself, but here is a nice video from Joshua Bardwell(my hero) that will walk you through it:
What I like about the module
Diversity, of course!
The other really cool thing is the band scanner. When you use the auto scan feature, it’ll pick up which frequencies are the strongest, and automatically catch whichever frequency is being transmitted on.
After using the NexWave module(stock) which had tiny dip switches to change bands – which was nearly impossible and incredibly inconvenient), I could just flick the scroll wheel and go to channel I liked. This is especially useful when you’re at a race and want to see someone else’s feed who is on a band other than yours.
What I don’t like
The idea of diversity on your goggles is just awesome – but a little bit oversold.
Diversity WILL improve your FPV feed, especially if you fly in a wooded area. But the increased range you may get will not be mind-blowingly significant – it’ll be maybe an extra 50-100 feet(I have not tested this fully yet, I hope to do so soon). If you just race in small areas, you may not need the more powerful receiver.
However, if you do freestyle and acro around obstacles such as trees and walls, then you’ll definitely see an improvement.
The module is inexpensive – at $40, it’s not too big of an investment – but you have to factor in getting a patch antenna, too, which can be anywhere from just $7 up to $25.
It’s a nice little gadget to have if you can afford it, but if you’re counting your dollars, save up for this later, and use the $40 on lipos and props.
Leave a Reply
You must be logged in to post a comment.