We’ve all been there – spending a good few hours on building a quad, soldering really tight joints, installing the top plate, and when you go to test the motors…
…you realize you have the motors in the wrong order.
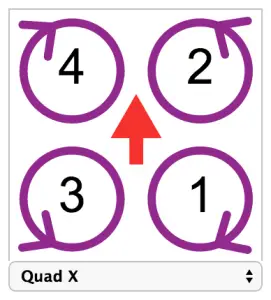
Just for reference, here is how the correct motor order should be:

When the quadcopter is facing away from you,
- The back right motor is motor #1, and should spin clockwise
- The front right motor is motor #2, and should spin counter-clockwise
- The back left motor is motor #3, and should spin counter-clockwise
- The front left motor is motor #4, and should spin clockwise
You can verify that this is indeed happening if you head to the “motors” tab, plug in your lipo to your miniquad(MAKE SURE PROPS ARE OFF!), and checking the little warning box.
Then start raising the sliders for each motor one by one – if you move the slider for motor 1, the corresponding motor should spin!
If it’s not spinning, make a note of which one is actually spinning under motor 1.
Then check the rest, and make a note of whichever motor spins with which slider. There is an easy way to fix this through the software, and you just have to remember which motor is spinning where.
Solution #1
Of course, before modifying the software, if it’s possible to do so you should just open up the quad and manually reconnect the wires to the correct pads.
If you are using pins and connectors, this should not be a problem at all – and you should do it this way, because you’ll have to keep changing the software settings any time you flash the board and forget to have a CLI dump lying around.
It’ll also get in the way if you reuse the board on another build and forget to flash and erase all settings.
If you’ve cut the wires to exact length, it’ll be a pain to try and resolder them to the correct pads, so in this case, you’ll want to use the resource remapping feature of Betaflight.
Also, if you are using a 4 in 1 ESC and the wires are swapped in it from the factory, you’ve got no choice but to do this!
Solution #2: Betaflight Resource remapping
Betaflight 3.1 onwards has an incredibly useful feature where all pads are assigned to a particular resource. In the Betaflight configurator, from the CLI, you can switch around these resources so what used to be assigned to motor 1 can now be assigned to motor 2, and so on.
Head over to the CLI tab, and type in
resource
The Command Line Interface will dump out a whole chunk of values – these are all the motor outputs, serial outputs, and any other pads on the board – along with what each pad is assigned to in the software. From here, you can change around any pad and match it to any resource – extremely useful if you lift a solder pad somewhere and need to use a different set of pads!
Copy the values and paste them into Notepad – you will want to keep track of what the original ones were!
You’ll see that the values being output say something like:
(paste dump)
Now you’ll remember from testing the motors which ones are backwards – say motor 2 and 3 are switched around. So you’ll want to type in
resource motor 2 [resource name from motor 3]
But before doing that, you’ll have to free up the resource being used by motor 3
resource motor 3 none
Then type in
resource motor 2 [resource name from motor 3]
and then
resource motor 3 [resource name originally assigned to motor 2]
Finally, type in save and hit enter. Do not forget this step! Any assignments in the CLI will not work unless and until you type in save and hit enter.
The board will proceed to reboot, and if you’d like to verify and double check, you can just go over to the CLI again, type in resource, and you’ll see that the resource values you changed earlier should have been reflected here.
You can further verify this by heading to the motors tab and checking again!
Final thoughts
The resource remapping method only works on Betaflight 3.1 and above. If you are using any version below that, I’d suggest that you upgrade to Betaflight 3.1+ first then do resource remapping.
However, if for some reason you don’t want to/can’t upgrade, you can still fix mismatched motors in the software using a more complicated process called custom motor mixes:
Wait, In my 4 in 1 esc, two motors are spinning in the wrong direction. Do I have to manually swap them? Resource just switched the motor output, like motor 1 spins when motor 4 is.
You can manually swap or you can change it in BLHeli configurator, both are fine.
Hey champ, quick comment just noticed after your motor direction image where your explaining motor directions, you’ve said motor 3 should spin clock wise…. whoops!!
Could get confusing at that rate, garth
Hey Garth, nice catch! I have fixed it. Thanks so much for pointing that out!